
One of the best business opportunities in India that you can launch from the comfort of your own home is starting a blog. To begin a career in blogging in India, you don’t need to leave your job or your studies!
Once you start earning money from your blog, you can turn it into a full-time business or job. Or you can start blogging as a side business too. But please remember, blogging is about more than just making money…
Businesses that are already established can also start blogging to increase the number of high-quality leads that come to them.
Blogging helps a business website rank higher on Google. In this article, I’ll also explain why it’s the smartest decision you’ve ever made.
Indians are first and foremost passionate readers. According to one research, the average Indian reads for more than 10 hours each week.
That is an hour more than Thailand, which has the second-highest reading rate with an average reading duration of 9 hours.
Additionally, every year there is a notable increase in the number of people in India who have access to the internet.
India is expected to have more than a billion (100 Crore) internet users by the year 2024. There will be a significant increase from the 750 million (75 Crore) internet users in 2020.

The best aspect is that starting a blog with a professional appearance is now simpler than it has ever been.
It makes no difference if you’re a college student or an expert web developer. I’m sure you can start a blog before the day is over with the correct knowledge & resources.
But first, let’s discuss the benefits of starting a blog in India.
Why Should You Start A Blog?
If you live in India and are interested in making money online, I recommend creating a blog. With the use of a blog, you can, if you so choose, enjoy life to the fullest.
Starting a blog in India is the very first step in this process that will lead to success for you.
Therefore, after reading this post, you will be well-informed on how to start a blog in India, which will create a new path for you to succeed in the future.
To start a blog, all you need is some direction and you’ll be fine. to make blogging simple for you.
Today, we’ll go over a few simple but crucial steps for starting a blog in India, enabling you to do so without making any mistakes and to make money from it pretty soon.
Lastly, I’ll also share with you some creative methods that will enable you to grow your blog to new heights and carve out a distinct identity in the blogging world.
What Are The Best Benefits Of Starting A Blog?
You should be aware of the potential consequences before starting a blog in India, right?
Some of you may be wondering, “Why should I create a blog?🤔” Will I benefit from it, or not?
I want to tell you that the year 2024 is a great time to start a blog in India and grow it to new heights.
The competitiveness in the blogging industry is growing rapidly. In such a case, you should establish a blog right away.
If you start early, you can have more opportunities and possibilities than those who come after you.
There are numerous advantages to starting and maintaining a blog in India. In addition, you will learn about a few unanticipated advantages of blogging that you can use now and in the future.
What Can You Achieve Through A Blog In This Digital Era?
There are unlimited things you can achieve through blogging in this digital and online era. I would like to mention the top 3 of them here.
1. You Will Have The Freedom To Express Yourself To The World
By writing to your audience about yourself, your knowledge, your services, your products, etc., you will have the freedom to express yourself through blogging.
You can gain your readers’ trust and establish a solid reputation with the help of the methods I will mention in this article.
2. You Can Help Others & Become Others’ Mentor
You already know that by starting a blog, you can write about any subject (on which you are an expert).
Therefore, you can assist your audience on that issue by generating content (in a particular niche) for your site. for example, I’m generating and publishing content related to Blogging, Digital marketing, making money online, and assisting new bloggers.
You can gain the confidence and support of your readers in this way, which will benefit you in the long run.
3. You Can Achieve Financial Freedom Without A 9to5 Job
I can assure you that blogging has a high potential for financial gain. Your diligence and hard work will eventually pay off, though.
Affiliate Marketing and Google AdSense ads are two additional & popular ways you can profit passively from your site.
I believe now you have no doubts about why you should start blogging in India. A blog provides you with the opportunity to both start making money and live a successful life.
So let’s get started and explore what is required to launch a blog in India. I will try to keep everything simple, informative & interesting.
What Are The Different Types Of Blogs?
There are so many different types of blogs in the online world. It’s all up to you which type of blog you want to start. Here is a list of some of the most popular types of blogs you can start right now.
Now, you’re fully aware – of what is blogging, and what benefits you’ll get with a blog. So now it’s time to answer our main question for which you have come here.
Pin This Image On Pinterest
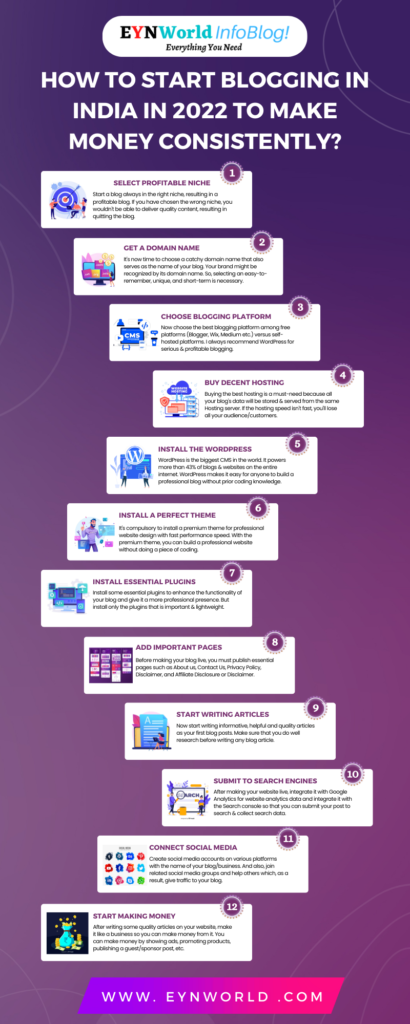
How To Start A Blog In India In Just 12 Steps?
This 12-step blogging guide can be lengthy but I insist you invest your time & attention here so that you won’t have to read any other guide or watch any other tutorial video to start blogging in India.
Step 1: Select An Interesting & Profitable Blog Topic Or Niche
One of the most crucial choices you have to make at the beginning of your blogging career is choosing a specific niche.
There’s no need to rush this. A niche you choose will affect your blog’s profitability and long-term motivation, so choose wisely.
1. What Is A Blog Niche?
You must first decide on a subject or topic for your blog before you can start writing. To be successful, it’s crucial to select a certain niche.
A blog niche is a narrow topic that you select in order to write about or produce any kind of content for your blog, avoiding wider topics.
A niche is similar to a subject, topic, or category. You must select a more suitable niche from among its various topics. You might be able to win the game pretty quickly if you start your blog in a more favourable and profitable niche.
2. Why Should You Focus On A Niche?
It’s usual that you won’t be successful if you attempt to create a blog that caters to multiple niches. News Sites are one of the best examples of a multi-niche blog.
News blogs are used to publish articles on nearly every topic whether it’s politics, business, technology, or sports. They get ranked because of tons of posts, their high domain authority, and so on.
But in your initial days, you won’t have these. So try to pick a subject on which you can write at least 100 articles. 100 may be a large number for you. But, if you truly want to become a good blogger for the longer term, you should be ready to produce that much content.
Therefore, it is always preferable to choose an area in which you are truly interested and are also somewhat knowledgeable.
3. How To Find Good Blog Topic Ideas?
First of all, find your interest in a wide range of topics such as –
Suppose you are interested in the Entertainment category. Just think & explore this category. The Entertainment sector is divided into several categories in India like – Bollywood, Tollywood, Sandalwood, Kollywood, TV, Web Series, Short Films, etc.
Let’s niche down this Entertainment category and pick ‘web series’ Now again, you may divide this into –
Any of the categories or niches can be narrowed down into smaller niches. Keep narrowing down a wider topic to smaller niches and create a list of all the potential blog topics for you.
4. How To Select The Best Niche For Your Blog?
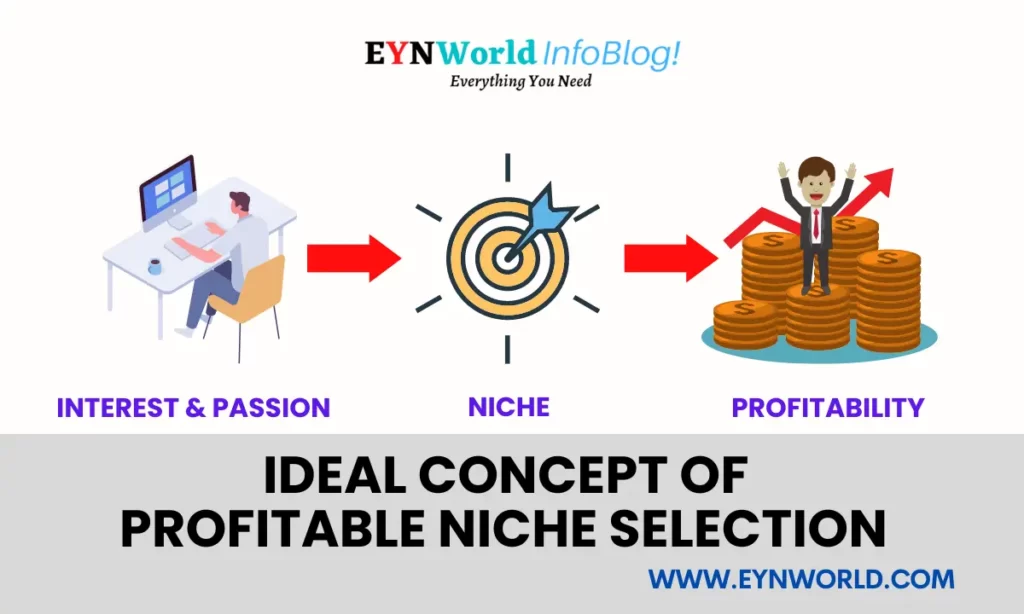
When choosing your niche, there are 2 factors you must do before going all-in.
Your profession, purpose, and passion should all revolve around your niche. It needs to be something that the world needs, that you love, that you are good at, and that you can make money doing.
If you want to be successful as a blogger, many resources recommend that you choose a subject that you are truly interested in. I think you’ll find that to be true in most cases.
It will be better if there is less competition in that particular niche. Make sure the niche you’re selecting is a money-making niche through any medium or method.
Step 2: Select The Best-Suited Domain For Your Blog
It’s now time to choose a catchy domain name that also serves as the name of your blog.
Your brand might be recognized by its domain name. It’s how others will find out about the amazing content you publish. You want readers to readily recall and recognize your brand. Therefore, be careful when selecting a domain name.
Consider your passions, hobbies, or life experiences when choosing the finest blog name or domain name. Additionally, it’s advised that you pick a .COM, .NET, or.ORG domain over others because they are simpler to remember.
Although most of the single-word domains are already taken, so opt for 2 or 3 words for the name. Use keywords that accurately describe your blog’s content when naming it so that search engines can recognize it and help you define your blog’s niche.
Avoid using hyphens and digits since they are hard to recall. And always aim for memorable or catchy names.
Utilize your name or a memorable variation of it to establish your personal brand as soon as your blog goes online.
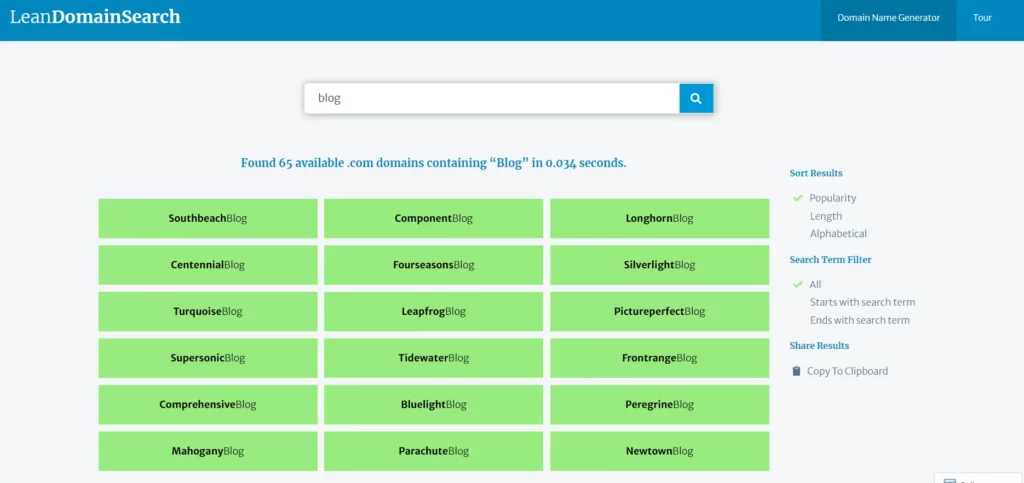
LeanDomainSearch is a very useful tool to find some amazing domain ideas. I also use this website often to find domains for my blogs & websites.
1. What Is A Domain Name?
Your blog’s domain serves as its specialized online address. Google.com, Facebook.com, and more are some examples. You can choose from a variety of domain extensions, including ‘.com’ ‘.in’ ‘.org’ ‘.co.in’, and so on.
It is always advised to purchase a ‘.com’ domain since it is among the most well-liked domain extensions. However, that is not compulsory at all!
2. Where Should You Buy A Domain Name?
There are so many domain registrars out there and you may purchase your domain name on any of those platforms.
However, I will recommend you purchase from trusted registrars like NameSilo, and others.
Use our exclusive coupon code “EYNWORLD” on a domain purchase at NameSilo and get an instant $1 discount.
As these reliable platforms have the highest uptime percentage, and the majority of the options, and if you get confused or stuck at any stage, their support system is always there to help you.
3. Should Your Name Be Based On Your Blog Niche?
It is quite advantageous to do this. People can predict what they will find in this blog by seeing the search results if the main term is added to the domain name.
Even though it’s not mandatory, all of this is beneficial for your blog from an SEO perspective and will help it rank higher.
Step 3: Choose a Platform Free Or Paid
You must have already selected a great niche and domain name for your blog by this point. We’ll now go to the most crucial step, which will aid you in creating a blog that appears professional.
You might be wondering what the next crucial step is at this point. The answer is the platform on which you’ll launch your blog.
Don’t worry; I’ll give you some tips on how to choose a platform for your blog. You can start a blog for free if you’d like, using a platform that won’t cost you anything.
You might also create a blog on a self-hosted platform if you have some extra cash to spend.
Before you continue, I want to talk to you about free and self-hosted blogging platforms.
Whether you agree or not, a solid platform makes your job easier and decides the viability of your blog. Therefore, I will advise you to start a blog by making a wise platform choice.
To make your work easier, I’ve provided a brief overview of the free and paid (self-hosted) platforms. I really hope this aids you in making an informed platform selection.
1. Which Are The Best Free Blogging Platforms?
There are so many free blogging platforms that you can use to start blogging without any cost. Some of the popular names are – Blogger, Wix, Hubpages, Medium, and sort of.
But if you want to start a blog for free, then you have to keep in mind that you will have to adjust with limited features. Here are some limitations or restrictions:
2. What Is A Self-Hosted Blog?
Starting a blog on a self-hosted platform is highly advantageous when taken seriously. Because you have full control here and a variety of functions.
Your blog is yours to maintain whenever you choose. In other words, you have complete control over the information on your site.
Let me warn you that setting up a self-hosted blog will cost you some money. However, this cost is not so high that you can’t afford it. If you choose, you can run a blog for just 300 (~$4) rupees per month.
If you are serious about writing, having your own blog on a self-hosted platform will be really advantageous.
Here, you have total control over the blog. You also receive a lot more features (including themes & plugins), which are crucial for establishing a successful blog.
WordPress can be the finest choice if you wish to build a self-hosted blog. We’ll explore more about WordPress’s benefits for you.
However, as WordPress is a self-hosted platform, you’ll require hosting to set up a blog on it. Additionally, you must consider a variety of factors before making a successful hosting purchase.
3. What Are The Benefits Of WordPress?
You might be surprised to know that WordPress is the biggest CMS or “Content Management System” in the world. It powers more than 43% of blogs & websites on the entire internet.
WordPress makes it easy for anyone to build a decent or professional blog or website. There are numerous benefits of having your blog on self-hosted WordPress such as;
4. What Should You Choose Between Free And Paid Platforms?
I think I don’t need to answer this question after you read 3 of the above sections. In short, if you want to pursue your blogging career for years or have any long-term vision, you must consider the Self-hosted paid platform.
Just think to yourself, if you’re getting something for free, you must consider why it is free! 🤔 Now the decision is yours!
Step 4: Get Ultra-Fast Web Hosting For Your Blog

In this section, we will talk about everything about web hosting including what is hosting, how to select the best hosting, etc. I will also share some most popular & reliable names to get ultra-fast web hosting for your blog. But before that let’s answer some queries!
In the 4th section, I will also tell you the ‘Secret Hack’ 😍to get up to 80% discount while purchasing a web hosting plan.
1. What is Web Hosting?
You are aware that a server is necessary for a website. It resembles a hard disc in a computer where you keep all the data of your blog or website.
This server allows access to your data whenever someone searches using your domain name.
Web hosting is a location where all of the contents in your blog are saved and displayed when someone attempts to access it.
Like a computer hard drive, hosting saves all of your data—including photographs, articles, and pages—and keeps it safe. The provision of space on this server is known as hosting.
2. How To Select The Best-Suited Hosting Plan?
To select the best-suited hosting plan for your blog, first, you need to understand the different types of hosting.
Here is the list of web hosting services that you will find in the market:
Shared Web Hosting:-
Most people use this hosting because it’s less expensive due to the fact that a single server hosts numerous websites here. This is a decent plan for a new blogger. For shared web hosting, I will recommend you to pick Fastcomet Hosting plans it’s because it provides fast, secure, stable, and cloud-based server hosting. . As I’m also using Fastcomet Hosting for the 2 different blogs.
I have also used some other hosting services such as FastComet, Hostinger, and DreamHost which are also great and worth buying.
VPS Web Hosting:–
In this sort of hosting, a portion of a server is made available to you exclusively for your use. It costs a little bit more than shared hosting. This gives you better performance.
Dedicated Web Hosting:–
If your business is expanding quickly, you should purchase this hosting. Because you get the whole server, which you may customize to your needs. But also keep in mind that it is pretty expensive.
Reseller Web Hosting:–
This hosting is beneficial for launching a business. Anyone can use reseller hosting to launch their own hosting company. This kind of hosting is something you may also sell to your client.
Managed WordPress Web Hosting:–
Managed WordPress hosting can be quite helpful for you if you want to start your own business but lack the time to deal with it. This particular hosting solution is expertly managed and specially tailored to give your WordPress blog the best possible performance. Rocket.net and WP Engine are perfect for Managed WordPress Web Hosting. By the way, FastComet, A2Hosting, and DreamHost are also some of the best alternatives.
Cloud Server Web Hosting:–

This hosting is best for a business website. But you can also use it for a personal website. In this service, you have to pay as per your usage, or you can also buy a specific plan. Cloudways is considered to be the best option for Cloud Web Hosting in the world.
After reading about all these hosting options you might be confused and you might be wondering which hosting should you opt for.
So let me tell you that if you are going to start a new blog, then Shared Hosting will be the ideal choice for you.
You can get cloud-based shared hosting from Fastcomet, which is fast, secure, and stable and provides you with a free domain, free SSL, and SSD storage servers. Click on Activate Deal and use coupon code “HAHOT75” at checkout to get a 75% discount exclusive for you. 😍
Activate Exclusive Deal ->
3. Which Are The Perfect Web-Hosting Platforms?
Well, we have already discussed some of the best web hosting platforms. If you’re going to start your blogging journey or you haven’t much experience in this field, you should go with Fastcomet as it provides fast, secure, simple, reliable & effective services.
Here is the list of some of the best web hosting companies:
4. Remember These Points While Buying Any Web Hosting Plan
Always remember to check the mentioned 11 must-have Points while making a hosting plan purchase for your first blog or business website, or for an existing website with good traffic.
1. Technical Support
Always check while purchasing a hosting plan if the website/hosting company provides you with 24×7 technical customer support or not. It’s a mandatory point to notice.
2. Free SSL & Domain
While purchasing a hosting plan, check whether it provides Free SSL & domain or not. Because SSL stands for (Secure Sockets Layer) which is mandatory while launching a website for website security and credibility, if the company provides a free domain, it would also be great.
3. Uptime
Always check that the hosting company provides you with guaranteed high uptime & their servers are running all time, so your website is always live and does not lose a single visitor. A 99.9%+ hosting server uptime is required and suitable for your website.
I have been using Fastcomet in my other blog since its start, and my website never got down for more than 5 minutes. In my case, the hosting average uptime is 99.97%+, almost 100%.
4. Website Security
Also, check they provide you with the best security services, such as Imunify360, brute force, and malware scanning & protection, so your website does not get hacked and is always live.
5. Fast Loading Speed
Their servers must be fast & secure, so your website opens quickly and is always secured. It also helps in your website rankings & user engagement.
6. Email Features
Always check that they provide you with free email features so that you can make your custom business email accounts and set up forwarders, Autoresponders, Email filtering, Email Virus Scanner, and unlimited email accounts.
7. Free Website Transfer
They provide you with a free website transfer if you have an existing website, so its data is transferred fast and live quickly, so you do not lose visitors. And you didn’t get charged for such a service.
8. Development Features
Always check if they provide you with development features such as SSH/Bash Access, Perl, Python, Node.js, Git, WP CLI, Drush, and PHP Frameworks (Symfony/Laravel/Zend) are available for free of cost so you can use these development features to develop your website.
9. No cancellation fee
They always provide you with the cancellation of their services without asking for any cancellation fee.
10. Money-back Guarantee
Many companies provide a money-back guarantee but check if they offer you a no-asked money-back guarantee or not so that you can get your full money if you don’t like their services within their money-back guarantee period. If the company provides a money-back guarantee for more than 30 days, it’s excellent and worth buying.
11. Popularity & reviews
This point is crucial and helps you get the best & Affordable web hosting for your blog. Always check if the company is famous among others and check their customer reviews on open platforms such as HostAdvice & Trustpilot, which are trusted and done by real users.
Mostly all the hosting companies claim to provide all the above features. But some companies follow these responsibilities and serve the services faithfully.
We have already mentioned those hosting providers above, but we will discuss them straightforwardly and advise you to use FastComet Web hosting services.
Because Fastcomet web hosting is perfect and advisable for starting a blog, as they provide all the features mentioned above, their customer support is also excellent.
Here you’ll get SSD lightspeed servers, more than 11 data centers, including (Mumbai) India 😍, imunify360 for website security, Free SSL & Domain, a 45-day no-asked money-back guarantee, and no cancellation fee.
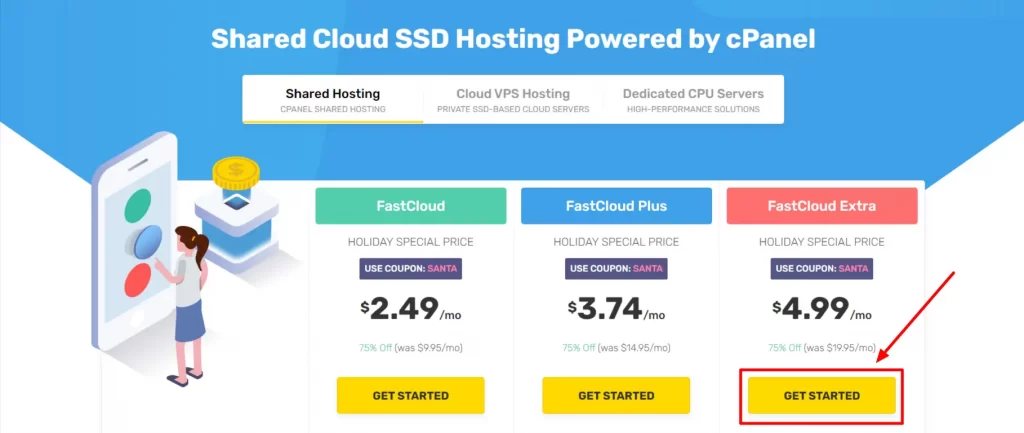
It already hosts more than 1M+ customers. its plans are also cheaper for new users which start from $2.49/month (the price is after a 75% discount & 3 year purchase)
Initially, I used budget hosting (I do not want to mention the hosting company name); my website speed was poor, and the website’s performance was also disappointing. Then I had a lot of research about hosting companies and used many hosting companies, but when I started using Fastcomet. I got surprising performance with excellent website speed.
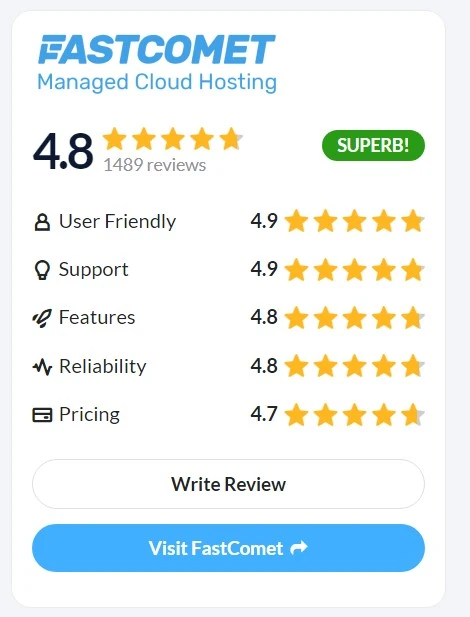
See the below-cited screenshot where you can see a 4.9-star rating of Fastcomet by more than 1489+ real users on HostAdvice.
Now we will know how to purchase the best hosting for a new blog or an existing blog. If you want to choose your favorite or another hosting provider such as; Hostinger, A2Hosting, Sitecountry, or DreamHost, you’re free to choose.
But I recommend purchasing the Best fast, reliable, secure, and cloud hosting at an affordable price from Fastcomet with an exclusive 75% discount 😍.
Here you’re getting A free domain which means you don’t have to purchase a domain from here or any registrar; it will save you almost $15.
So without wasting time, let’s purchase the best and most popular web hosting at an affordable price.
Pro Tip: Hosting prices are affordable and cheaper for new hosting users. It’s because they provide hosting at a cheaper price with higher discounts. Renewal prices are higher, meaning if you’re purchasing hosting for a month or one year, you have to pay standard renewal prices to use its services further. If you want to get the hosting at an affordable price and want to run your blog for the long term, consider buying a hosting plan for a more extensive billing cycle. It will save you a lot.
5. How To Purchase The Best Hosting Service (Fastcomet)?
As I promised, I will tell you the trick to get a 75% discount on purchasing hosting services. But before that let’s go through the steps to buy a hosting service!
Step 1
Visit the site of Fastcomet through my special link and proceed to click on Plans & Pricing.

Step 2
Now scroll down and pick a suitable package from the comparison table, as per your preference. Click to select the plan. Personally, I selected the third one in my initial days.
Step 3
You will get a free domain name from Fastcomet for life. Now find a suitable domain name for you and select one, then click Use this domain.
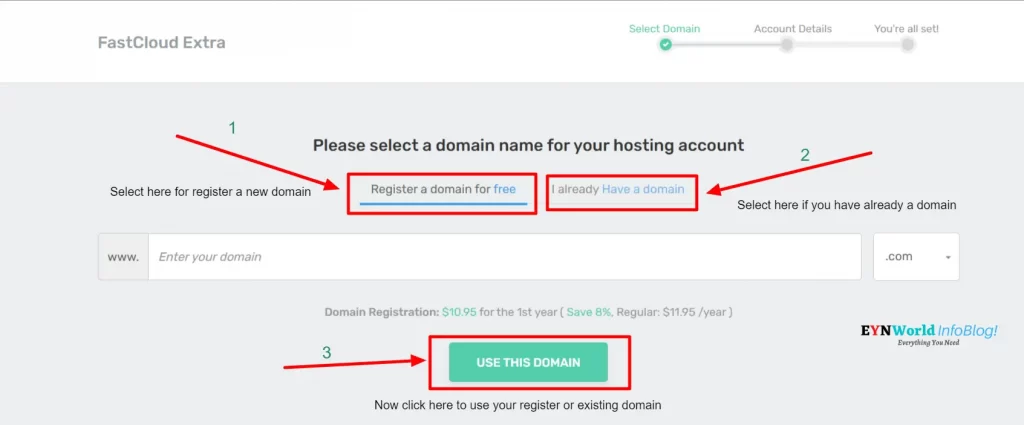
Step 4
Select the nearest Data Center for the best website performance and select the preferred billing cycle, which I had selected for 3 years(triennially);(I would recommend you to get hosting for a bigger billing cycle for greater discounts).
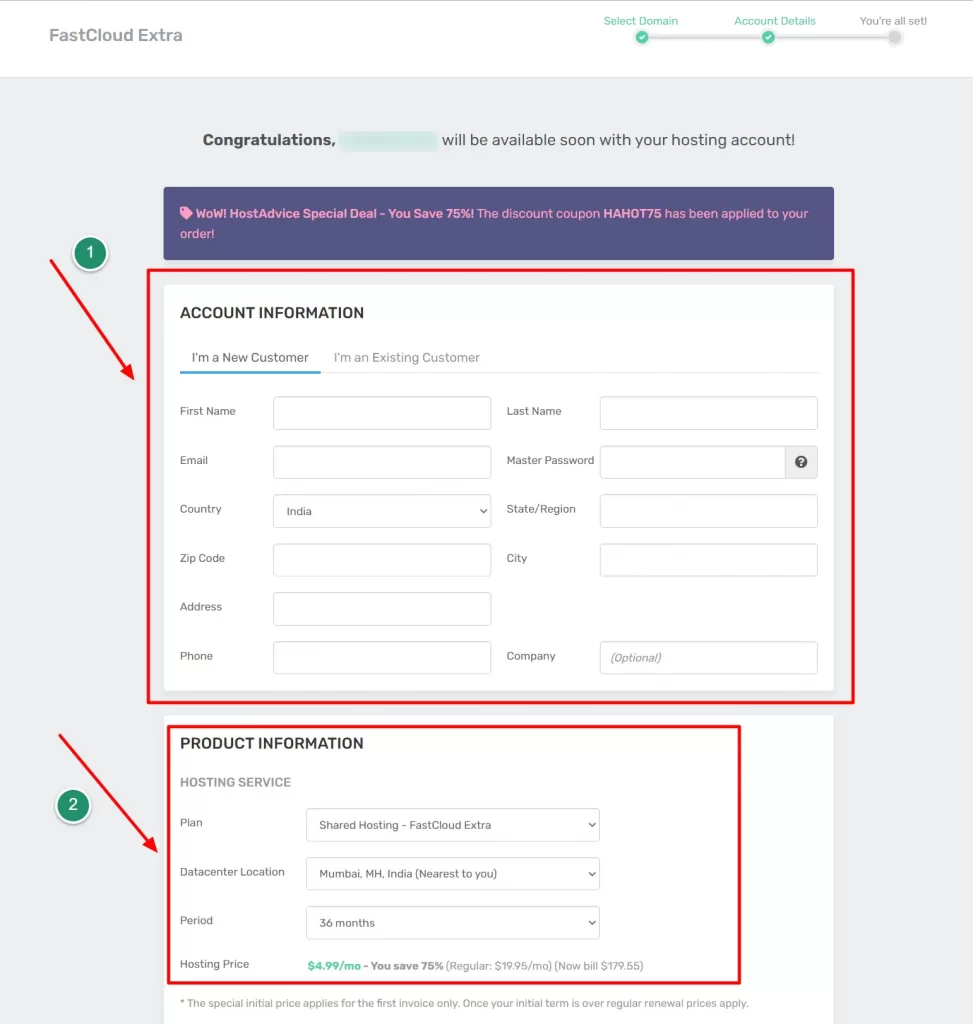
Step 5
Now use the exclusive coupon code HAHOT75 to get a 75% discount at the time of checkout.
Finally, enter your personal information and select a payment method like debit/credit card, PayPal, etc. Confirm all your details and proceed to Checkout/Complete Order.
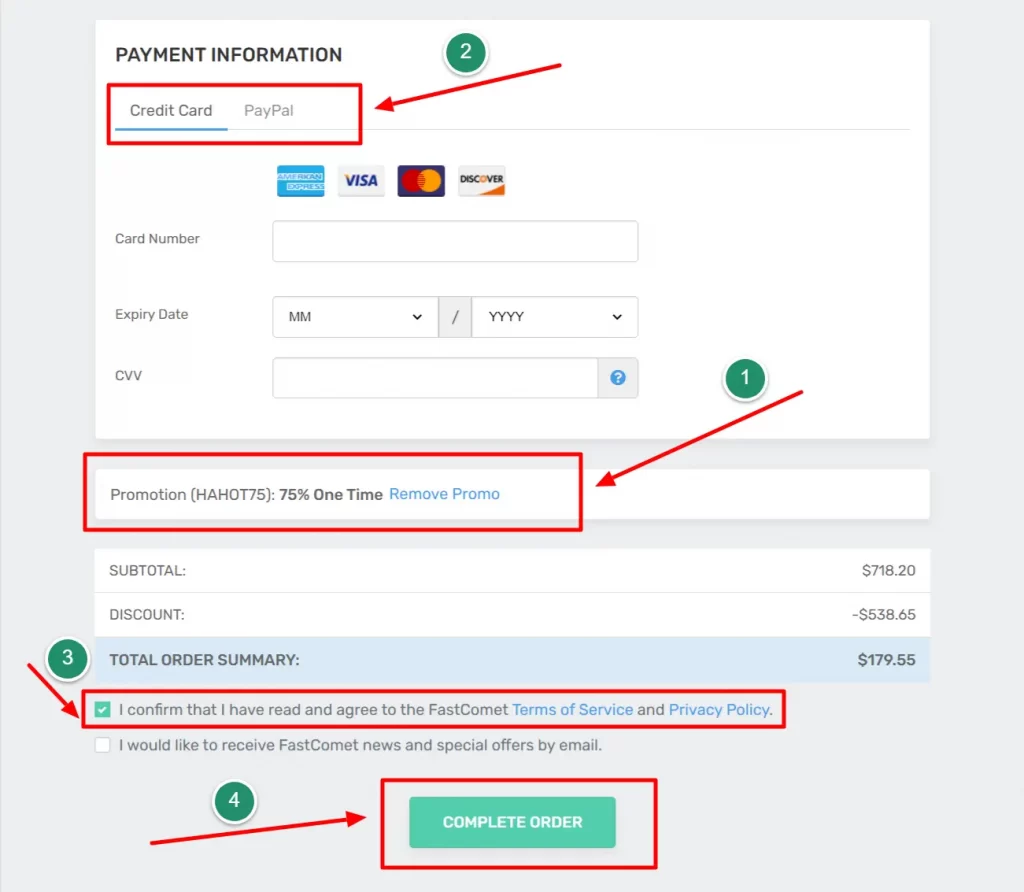
After the completion of the transaction, you will receive an ‘order confirmation email from Fastcomet within 1-2 minutes.
Follow all the steps available in your email and you’re good to go.
6. How To Set Up Your WordPress Blog On Fastcomet?
In the next step (Step 5) we will discuss this in detail. Simply you will have a cPanel (traditional, simple & reliable). There you need to install WordPress through Softaculous.
7. How To Configure Your Existing Domain With The Blog?
Step 1
Log-In your Fastcomet dashboard, go to ‘Domains’ and then ‘My Domains’, under that click “Manage Domains’.
Step 2
Now go to the ‘Nameservers & DNS Zone.
If you purchased your domain on the same platform, you can choose “Use default nameservers”. Otherwise, you will have to “Use custom nameservers” if your domain is on another platform.
Suppose you have purchased your hosting on Fastcomet but your domain on NameSilo. In that case, collect the DNS details of Fastcomet and copy-paste them into the NameSilo domain management area.
Step 5: Install & Setup WordPress Account?
In this step you’ll know how to install a WordPress account from different methods, and
1. How To Install WordPress From A Hosting Account?
Fastcomet offers conventional cPanel website management and monitoring.
You have all the features and tools you need to administer your website with the cPanel control panel, including a Free SSL Certificate for encryption, regular Backups to make your blog restore-ready whenever you need it, and many other tools of this nature.
Follow the below-given steps to install WordPress.
Step 1
Goto your Fastcomet dashboard, scroll down to Products>My Products click on the “cP” icon (control panel) and click proceed after entering the master password.

Step 2
Now the control panel is open, click on the search bar and enter “WordPress”. After that you’ll see “WordPress Manager by Softaculous”, click on it.

Step 3
Now WordPress management dashboard will open. Click on the “Install” button. Now select your domain in choosing the installation URL with https:// protocol.
Scroll down and fill in the basic details such as website name, description, account username, and password.
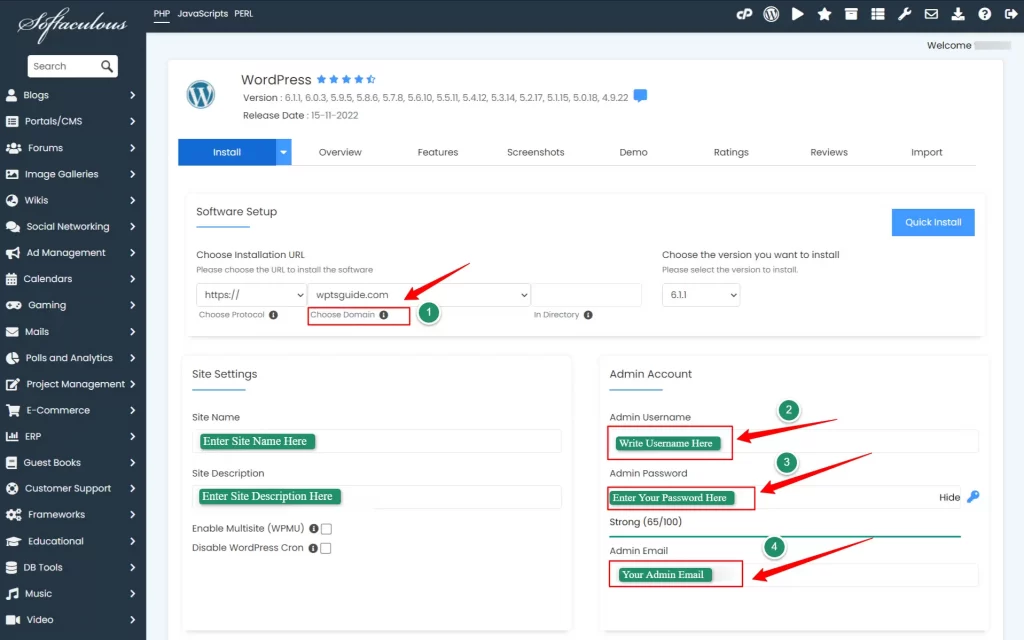
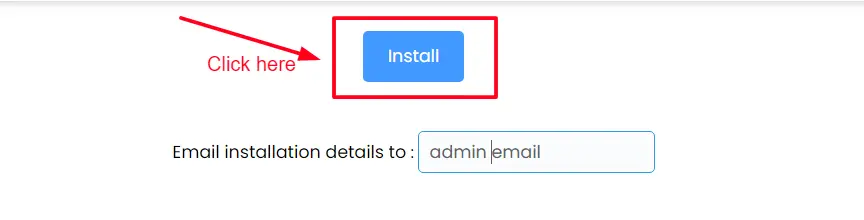
After that scroll down and click install.
Pro tip: Save your email address, username, and password in your computer’s notepad or in a secured location, or in any notebook.
Wait for a few seconds and boom your WordPress installation is successful. 😍
2. How to set up your WordPress account?
Now you have successfully installed WordPress with the help of the above instructions and your WordPress Blog is ready to manage & explore.
Login to your WordPress Blog Dashboard by using the link “blogname.com/login” or “blogname.com/wp-admin” in your browser search bar and enter.
Replace the term “blogname.com” with your “domain name”. You can bookmark this URL for the future.
Here, you must provide the email address/username and password that you used while installing WordPress. Your WordPress Dashboard will open up when you enter the login page.
You must make a few important changes to your WordPress Dashboard before continuing. Here are the three most important settings:
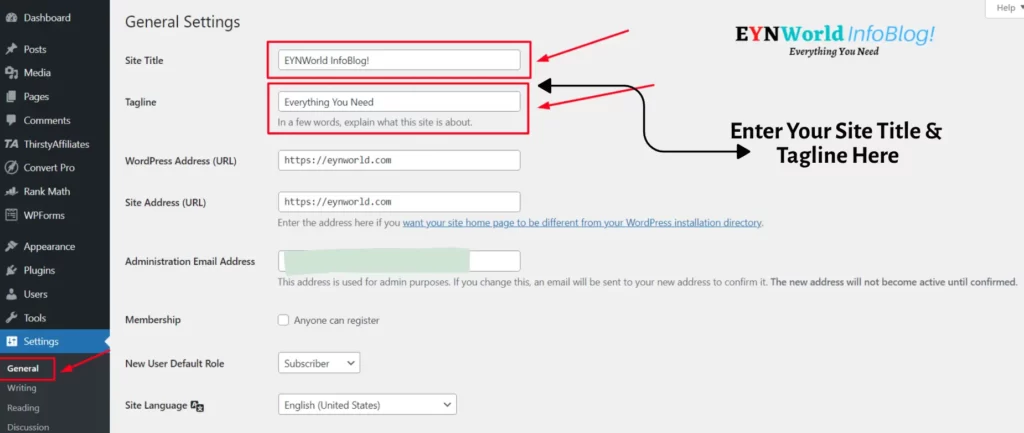
General Settings
Enter the site title, and tagline, and select site language, A screenshot is shared below which includes these settings.
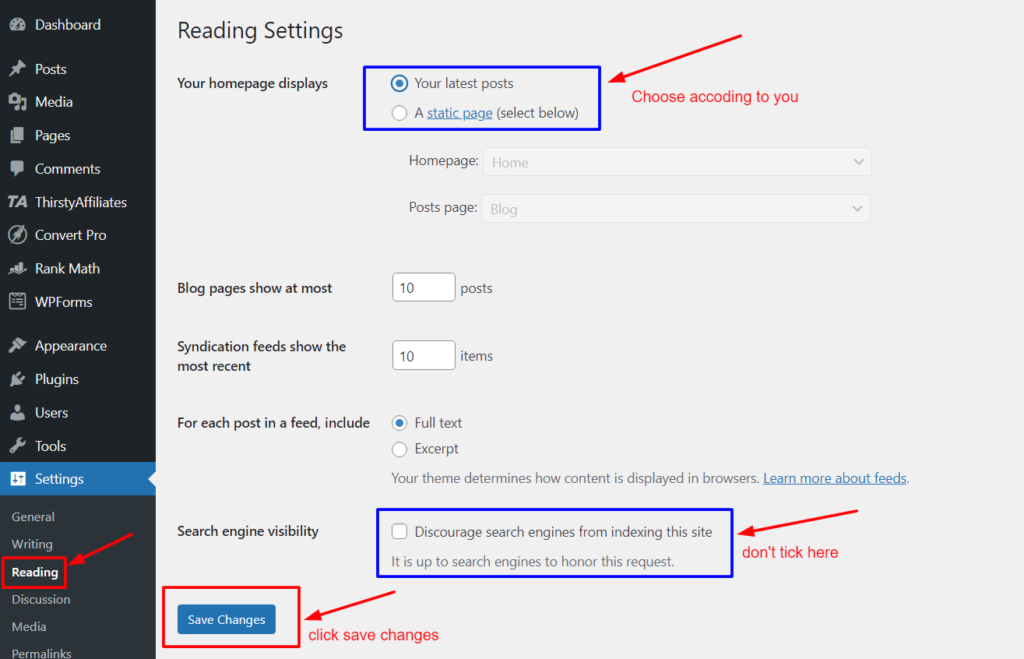
Reading Setting
Don’t tick or click on the ‘Discourage search engines from indexing this site option because if you click on this option, your site wouldn’t be crawled by google or indexed in the result your site couldn’t rank.
Permalinks
Set your blog post permalink to https://blogname.com/postname, It will help you with SEO.
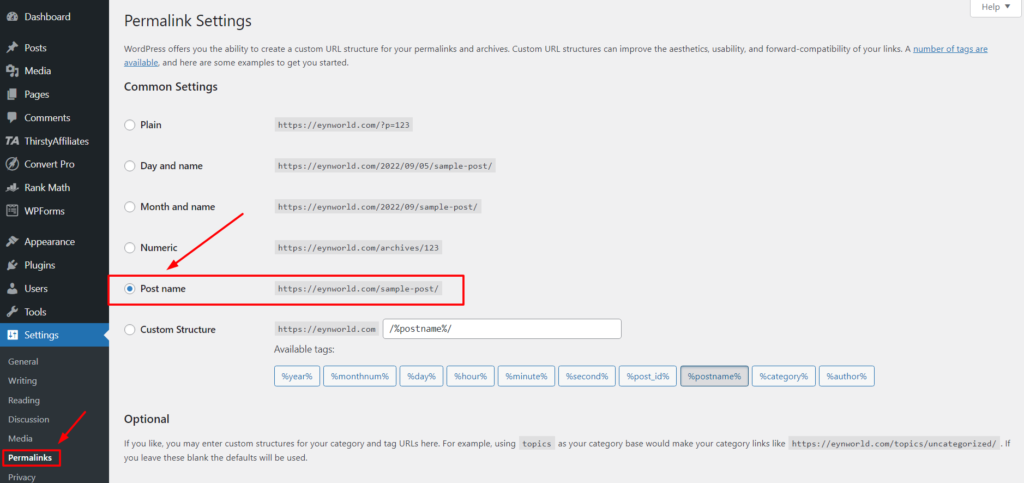
The most crucial settings must be made before using any other WordPress dashboard feature. Later on, you can change further options.
Step 6: Install The Best, Lightweight & Fast-Loading Theme For Your Blog
The appearance of your WordPress blog is important because you are establishing a new blog.
In blogging, a blog’s appearance and design are very important because if your blog design is poor, you will lose a lot of readers and traffic. Readers are drawn to blogs with attractive designs and layouts.
You are free to utilize any of the free WordPress themes in your portfolio for your blog. However, I would never suggest that you utilize the Free WordPress theme if you want more customization options and features on your website for a professional look.
If you are committed to your blog and see it as a career, it is wise to spend money on the Best and Fastest Premium WordPress Themes and other premium tools.
1. Which Types Of Themes Should You Choose For Your Blog?
Even though the market is flooded with premium themes, it is impossible to try them all.
However, I’ll show you a few premium themes that are pretty well-liked. These themes are also used by many professional bloggers.
I’ll go through some additional, highly popular themes. To ensure that you get a better theme, you should consider a few things before making your purchase.
- The theme must be lightweight and user-friendly.
- The latest WordPress version is compatible with that theme.
- Your theme must be responsive.
- Make sure the theme company provides technical support or not.
2. What Are Some Best Themes In The Market?
By the way, I have used the Rishi theme in my blog, which is one of the fastest and lightest themes.

In this theme, you also get huge numbers of readymade templates that you can install on your blog. Also, this theme is very easy to customize.
In Rishi Pro Theme you’ll get some Advanced Blogging Features that will help you in ranking, increasing CTR, SEO, increasing revenue, and increasing engagement, such as;
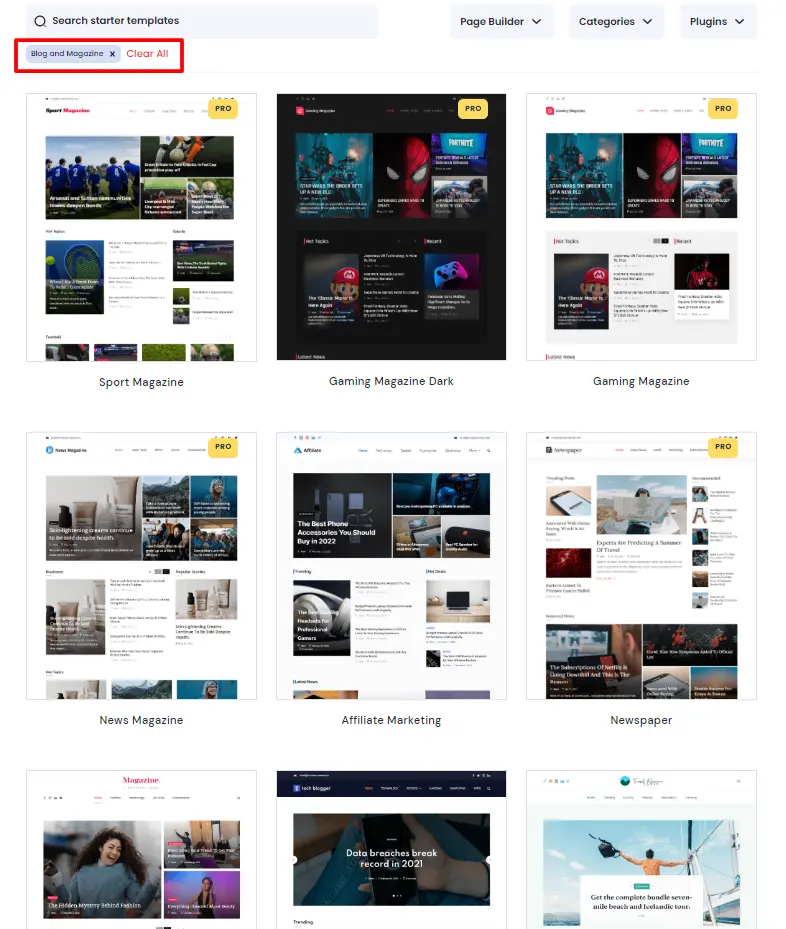
You will also get 90+ pre-made starter websites with Rishi Theme Pro which you can use to make a professional, fast, and performance-ready website with just a single click.
There are 9 pre-made starter sites for Blog and magazine website.
You can use all the features mentioned above on your website and don’t have to use multiple plugins for the same features; using multiple plugins will decrease the website’s speed & performance. If you really care about such features without losing the website speed and performance then purchasing a pro version of Rishi Theme will be great for you.
You can get all the features by purchasing a Pro version of “Rishi Theme” by clicking on the below Try Rishi Pro Theme button, which will automatically save you an additional 20%. Because we have collaborated with Rishi theme and generated an exclusive 20% discount deal only for EYNZone InfoBlog! members.
There are also other good themes available in the market which I have also used and liked such as Astra, Generatepress, KadenceWP & Divi.
3. How To Install A Perfect Theme In Your Blog?
As I said, Rishi is a lightweight and fast-loading theme, so it would be perfect for your new blog. Now let’s go through the procedure to install this theme in your blog.
Follow the below-mentioned steps to Install the best lightweight, fast, core web vitals optimized, and easy-to-customize theme “Rishi Theme”.
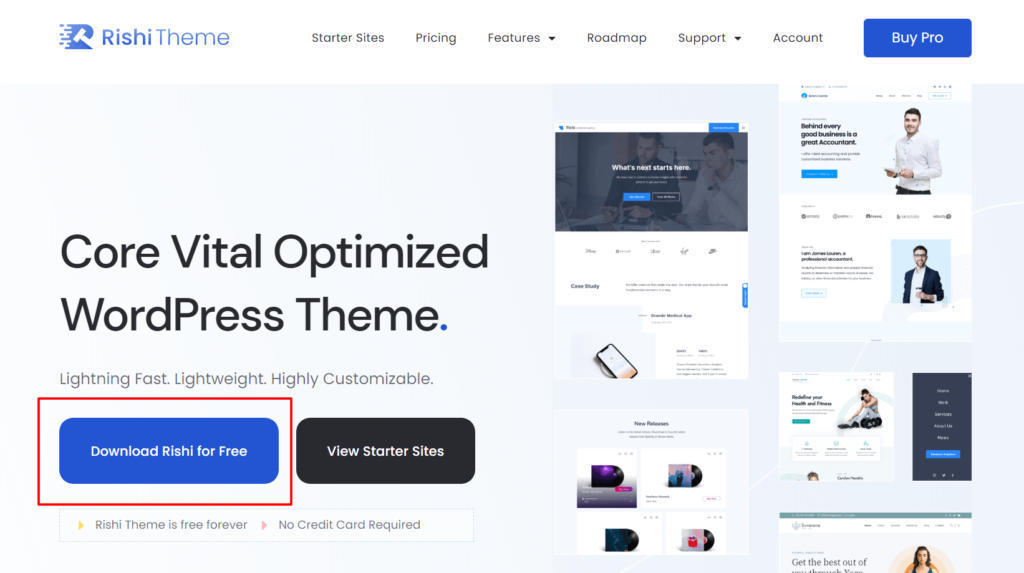
Step 1
Click on Rishi Theme, and open the official site. And click on the “Download Rishi For Free” button.
Step 2
Now the Rishi theme download modal will be open. Just fill in the basic details such as email address, first name, and last name. And click on the “Download” button.
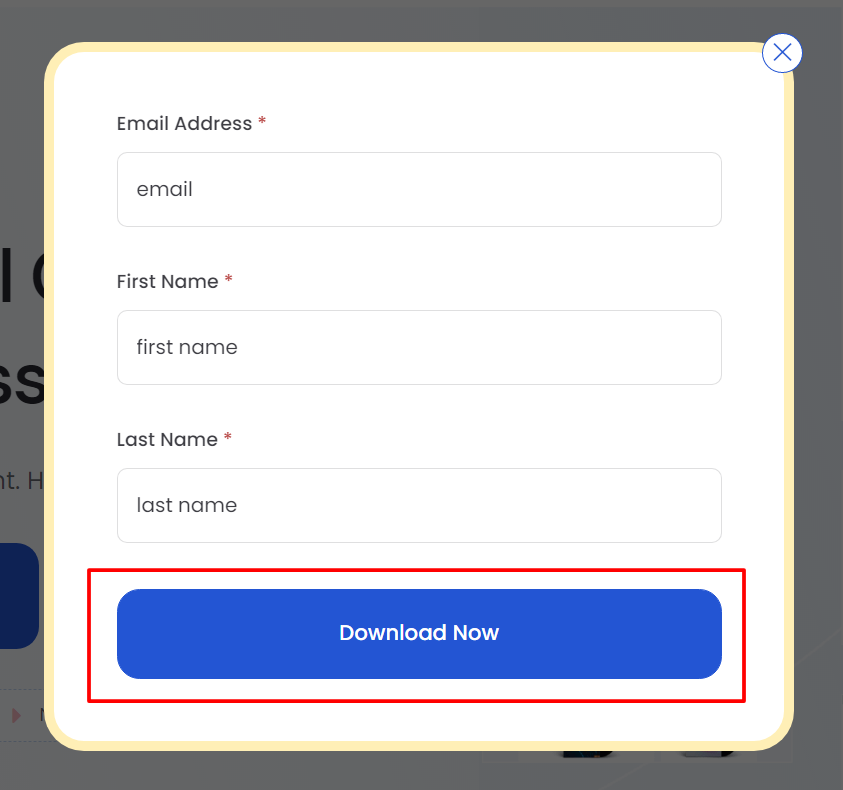
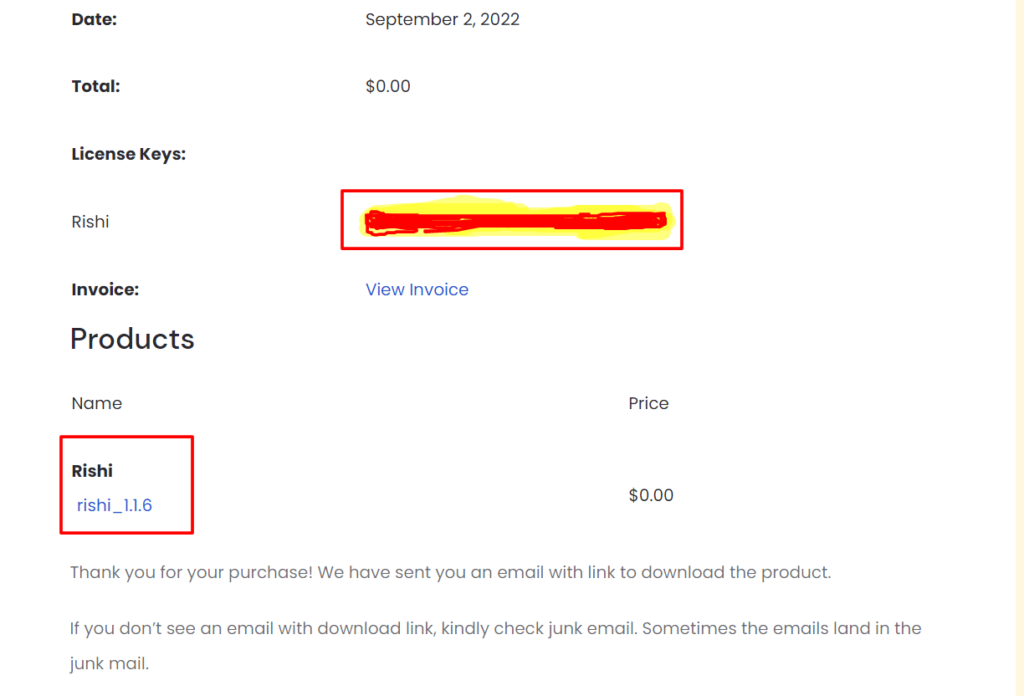
Step 3
After clicking on Download Now button you’ll see a purchase receipt. Scroll down and you’ll see the license key & product Rishi theme file. Just click on rishi_1.1.6(version) and download the file.
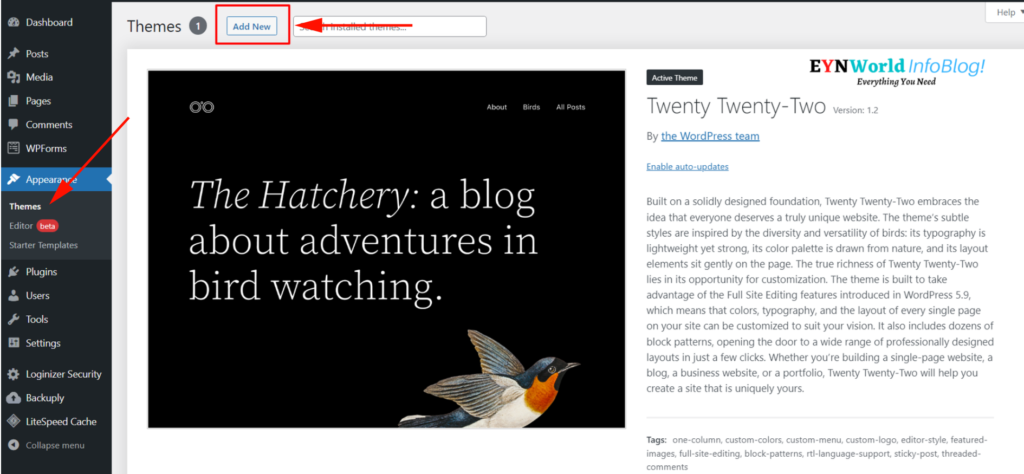
Step 4
After downloading the file go to WordPress Dashboard > Appearance > Themes. Now click on Add New theme, you can see below-given screenshot.
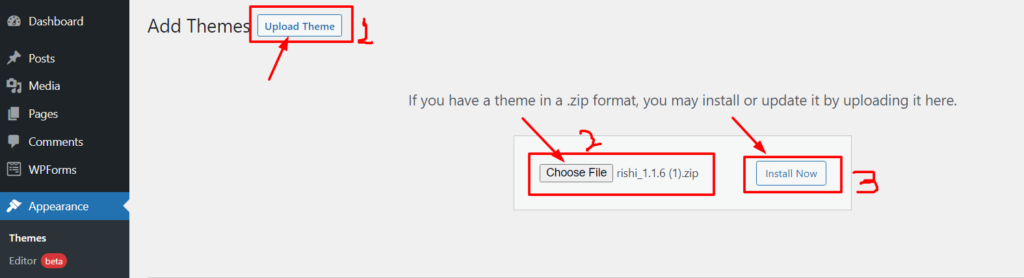
Step 5
Now you’ll see an option called Upload theme just click on it, You’ll see choose file option, just click on Choose File and select Downloaded Rishi theme file. Now just Click Install Now.
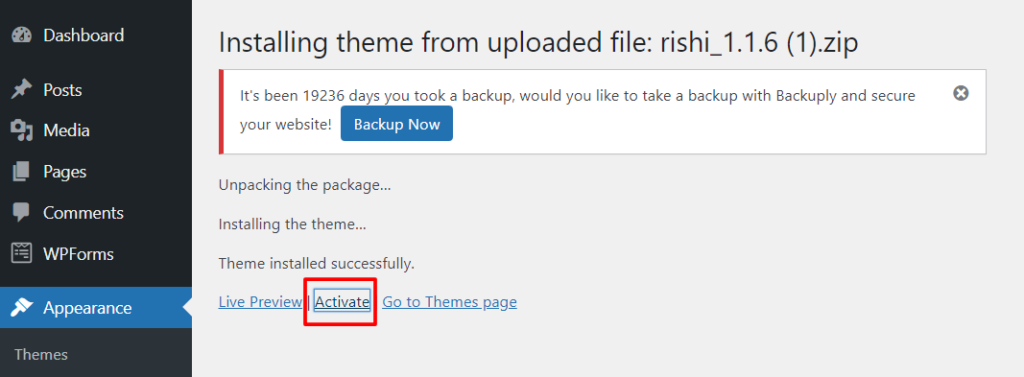
Step 6
After installing the theme click on the Activate option. Good News! 😍 The theme is installed successfully, and ready to customize.
If you’re still facing any problems with installing the Rishi theme. Watch the full video, follow all the steps available in the given video, and install the Rishi theme.
If you want to use another WordPress theme you can follow the below-mentioned steps;
Step 1
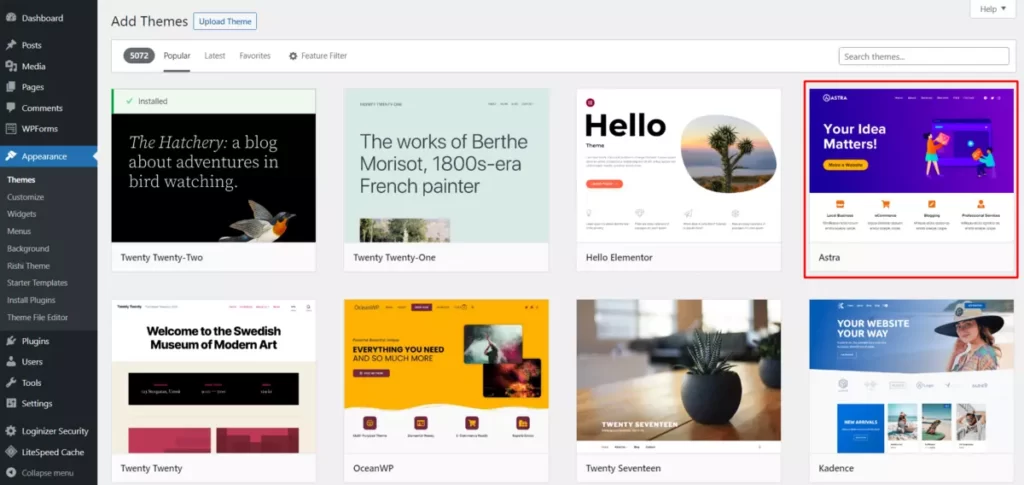
Go to your WordPress dashboard, look for ‘Appearance’, and click on ‘Themes’. Now click on ‘Add New’ to add a new theme.
Step 2
You will be shown a huge library of themes where some featured themes will be displayed first. Either you can select any random one or search for a perfect theme. For example, we have selected the Astra theme.
Step 3
To install a theme, click ‘Install’ and then click ‘Activate’ to get done.
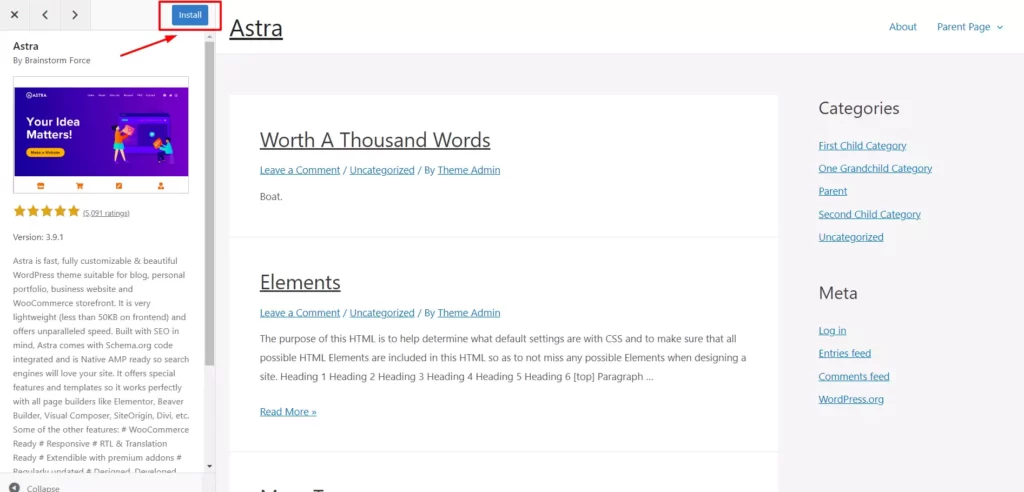
That’s it, your theme has been installed!
Step 7: Install Plugins To WordPress Blog
Now let’s talk about the plugins and their benefits. We will also talk about some of the most important plugins for your blog.
1. What are the Plugins?
Plugins are a type of software that you may use to enhance the functionality of your blog and give it a more professional presence.
You won’t be able to use several features of your WordPress blog if you don’t use the plugin.
2. What Is The Purpose Of Plugins?
Plugins, in a sense, act as WordPress’s wheels. In the absence of it, WordPress is almost useless.
You may improve your blog’s content, SEO, loading speed, and security with the aid of the plugins. Let me discuss a few essential plugins that every aspiring blogger needs.
3. What Are The Most Useful Plugins To Install?
There are tons of Plugins available in the WordPress dashboard or library but you don’t need to install all of them. Here is the list of the most useful plugins you must install for your blog.
a) SUCURI Plugin

Sucuri is a cloud-based WordPress security tool used to secure WordPress blogs & websites. This plugin filters all the traffic before reaching your blog or hosting server.
The SUCURI plugin has lots of features including malware detection, integrity monitoring, and security hardening. Sucuri doesn’t do any deep scans on the server level because it checks everything remotely.
The premium version of Sucuri offers to safeguard websites, enhance performance, keep an eye out for signs of hacking, and provide limitless help for security breaches.
It’s important to remember that Sucuri is intended to enhance your current web security. It offers you a variety of solutions to lower risks, improve your level of security awareness, and provide you with more peace of mind.
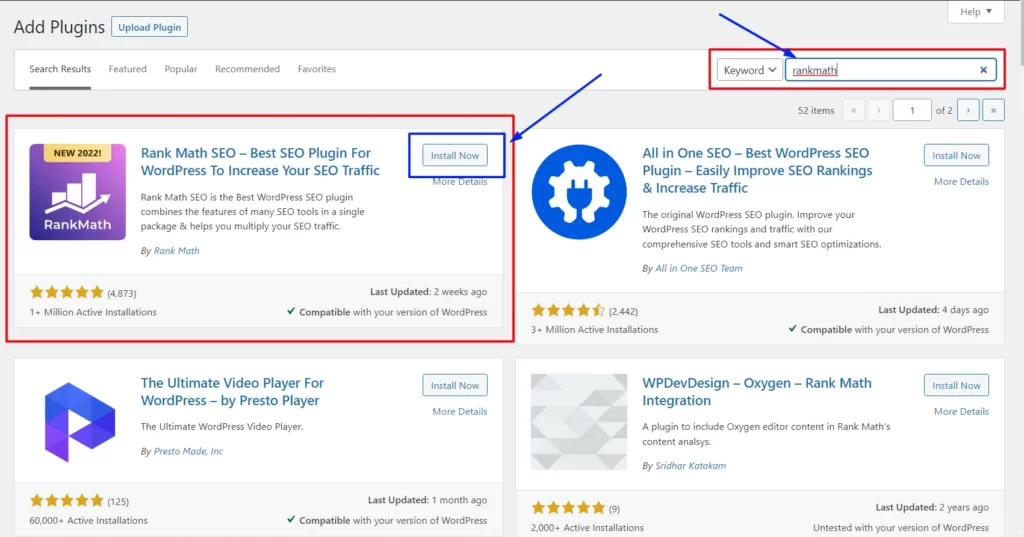
b) RankMath Plugin
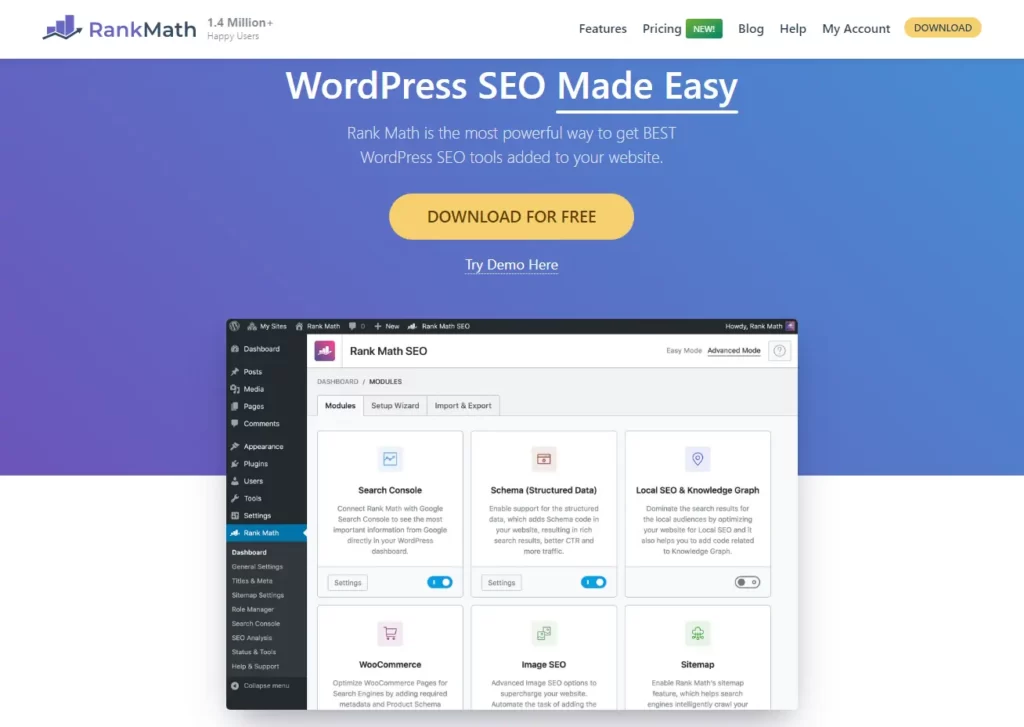
Rank Math is a plugin that works like an SEO suite. It has a lot of features to make sure that your website is optimized for search engines in the best way possible.
The major difference between Rank Math and other SEO plugins (like Yoast) is that it’s a freemium plugin. This plugin offers more features even in its free version than any other plugins do.
However, Yoast SEO is a good alternative to RankMath & has similar features. Personally, I prefer to use RankMath. Even many new-age bloggers also prefer RankMath.
Note: A detailed RankMath Review with How to use it for best SEO results will be published soon. Stay tuned! 😍
c) UpdraftPlus Plugin
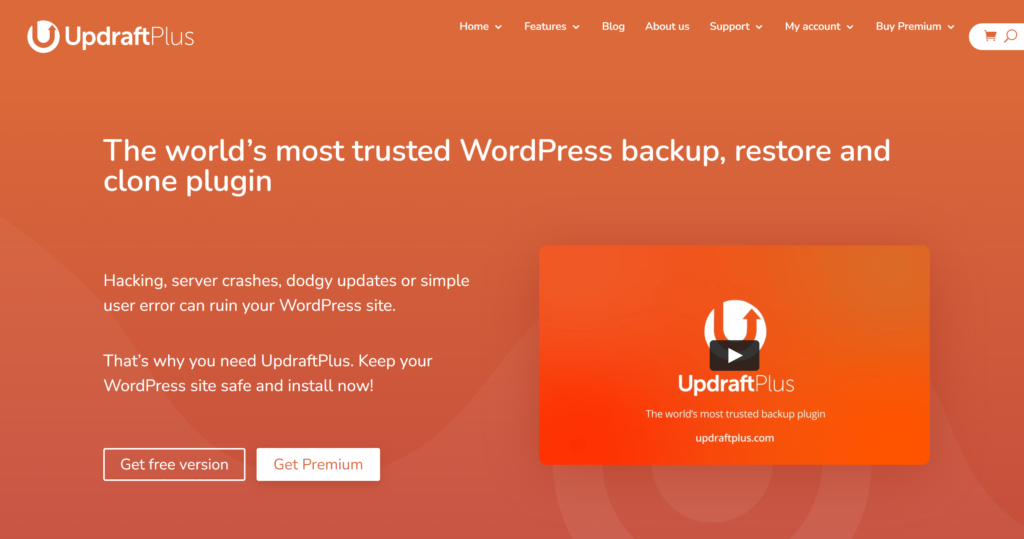
UpdraftPlus is the most widely used scheduled backup plugin in the WordPress library, with over 10 lakhs (1 million) active installations.
It’s one of the most feature-rich WordPress backup plugins available. Even for those who are completely inexperienced, UpdraftPlus makes it simple to set up and recover backups.
Compared to the majority of other plugins, it provides more cloud backup alternatives too. It is the top pick if you require a fast.
This plugin doesn’t impact your website performance. It uses fewer server resources than most of its rivals because it is highly optimized for server performance.
d) WP Rocket Plugin

WP Rocket is a WordPress caching plugin. Its objective is to speed up your WordPress website with only a few clicks and without requiring you to set up any complicated settings.
If you don’t know what a cache is, let me explain it to you. The cache is a mechanism that keeps the data record of your last visited sites.

The purpose of Cache is to load the same site faster for the next time. But in the long term, it harms your website performance. That’s why we use the WP Rocket plugin to clear these cache files and make your site faster.
e) Elementor
Elementor is a drag-and-drop page builder for WordPress. You can use a visual editor to create stunning pages with the aid of this plugin. It is intended to let you easily create dynamic web pages.
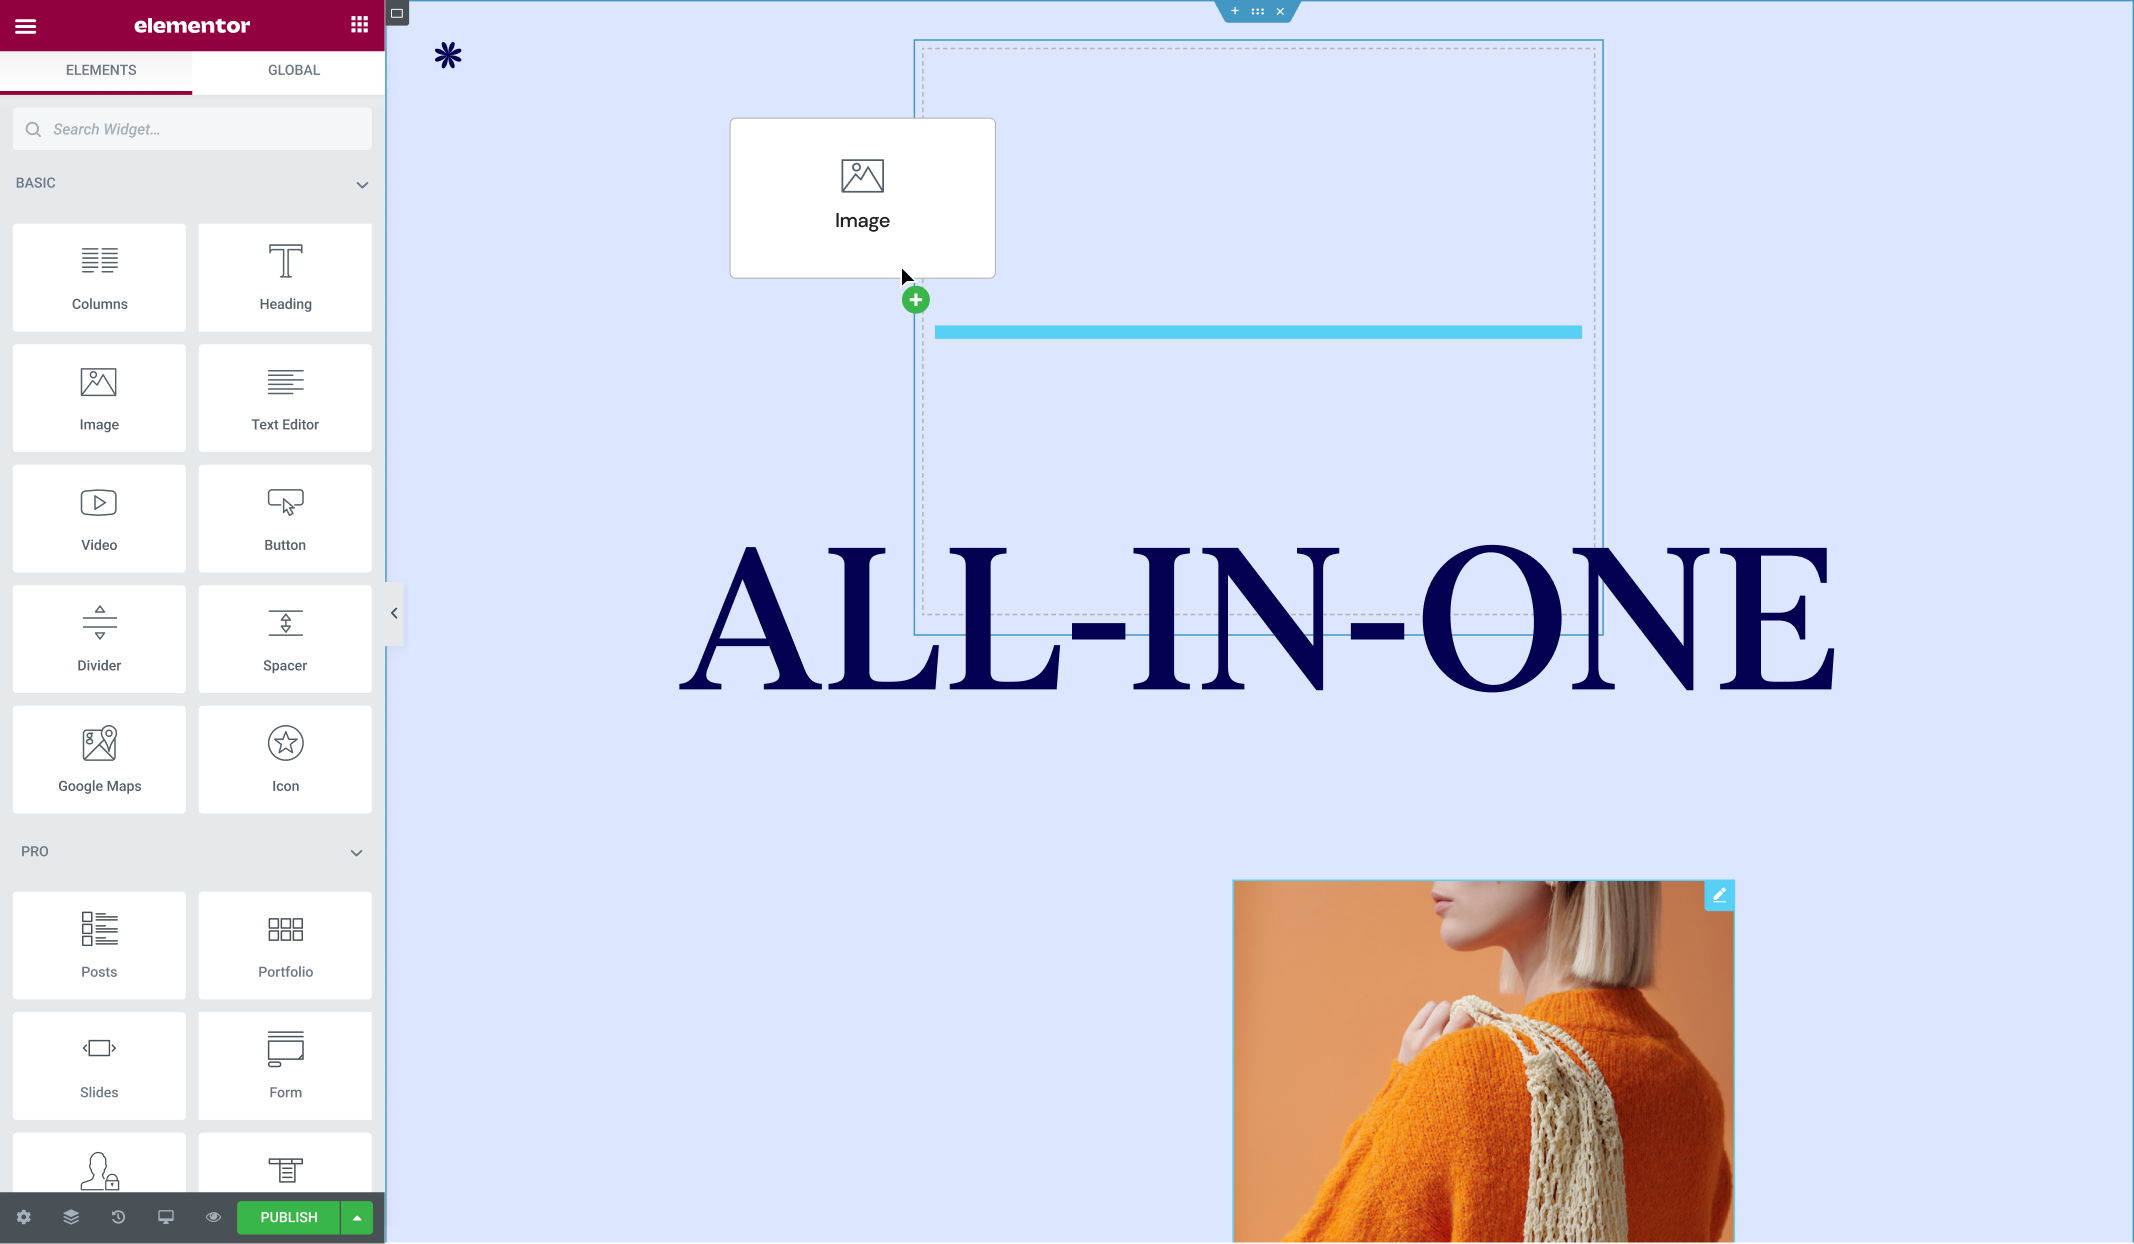
With this WordPress plugin, you have access to a one-stop shop for managing every aspect of the appearance and experience of your website.
Any type of professional or beginner blogger can use Elementor. If you’re not a tech-savvy guy, you have the option to drag any of the 90+ widgets in the visual editor to generate content.
Elementor is a powerful tool for creating any type of web page, including complete websites and specialized landing pages. You can create custom forms as well as sales and marketing pages.
f) AffiliateX
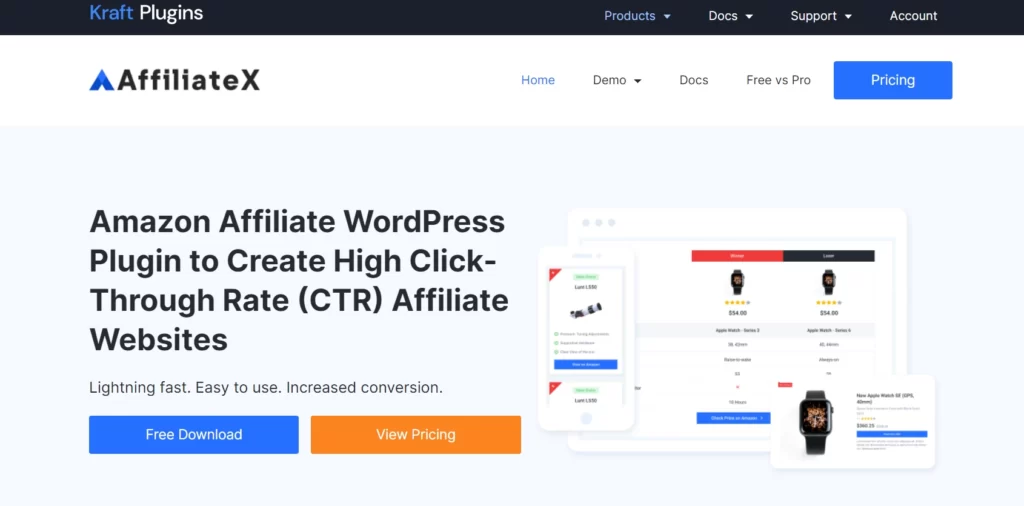
AffiliateX is the perfect plugin for professional bloggers who want to become pro affiliate marketers.
It is the finest WordPress plugin for affiliate marketers since it enables the creation of comparison tables, tabs for single products, coupons, and product boxes to produce affiliate blogs with high CTR and conversion rates in a flash.
With AffiliateX, you can create & design your content in every aspect to make money through affiliate marketing.
This plugin has lots of customization and layout options. It eliminates the requirement for those bulky page builders which harms the website loading speed and performance. Read our detailed AffiliateX Review here…
Click on the below button and get an exclusive 20% discount while purchasing a plan.
g) Social Snap
Social Snap is a WordPress social media plugin that enables you to manage how users share and access your articles or posts, assisting you in making the most of social media traffic.
This plugin is really fast and very simple to use. You can activate & set up this within minutes.
It’s a feature-rich plugin that performs just how you need it to, offering access to over 30 social networks and apps and the flexibility to position share buttons virtually anywhere on your website.
You can always add more plugins or remove anyone as per your requirement in the future. There are unlimited plugins out there but it is a bit difficult to mention them all in one post.
Pro tip: Never use a Cracked, GPL, or Nulled theme/plugin in your WordPress blog. It will harm your site and may lead to your website hacking. If you want to run your blog run for the long term, be secure, and not get hacked then invest some money in your initial days to buy original premium themes/plugins & run your blog professionally.
4. How To Install Plugins?
Installing plugins is as easy as it was for installing the theme.
Step 1
Go to your WordPress Dashboard and Click on Plugins.
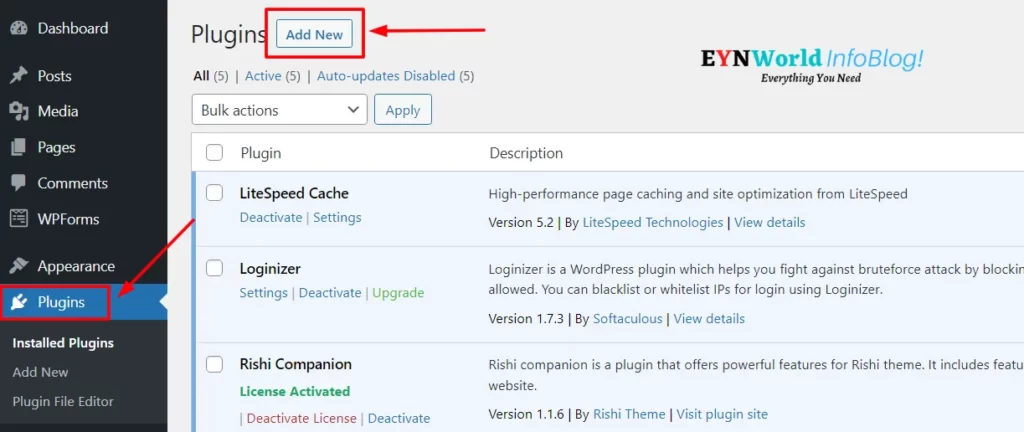
Step 2(a)
There are 3 ways to pick a plugin. Either choose one from the featured plugins or search it by using a search bar.
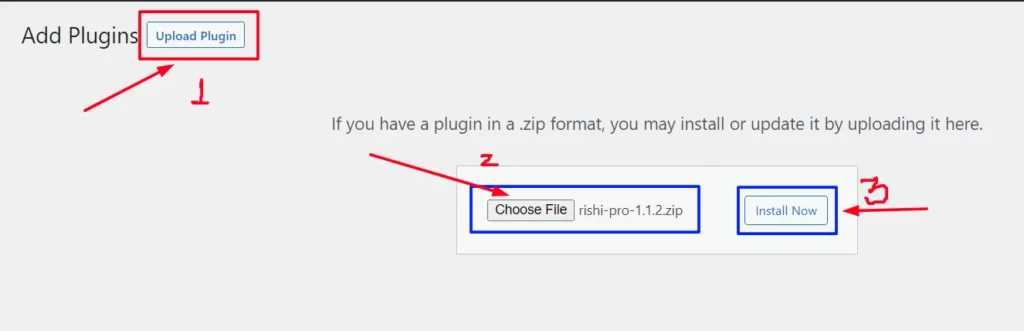
Step 2(b)
The 3rd way is to click on the ‘Add New’ option. Upload the plugin file if you have downloaded it from another site. Now click on ‘Install Now’.
Step 3
After the Installation, click on ‘Activate’.
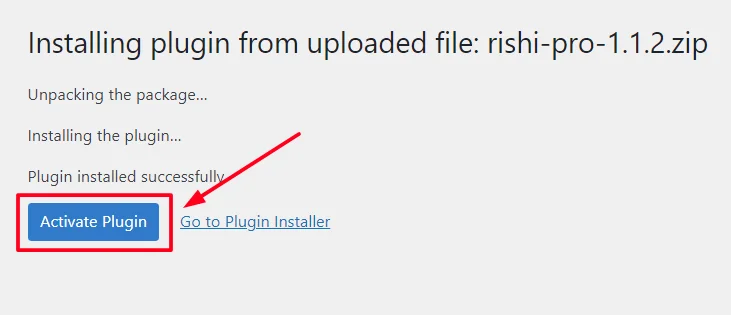
You may customize its setting or use it as the standard.
Step 8: Add Some Important Pages Your Blog Must Have
Do you know which blog pages are the most essential for your blog? 🤔If your previous blog is supposed to produce income or if you’re developing a new one, you can build a number of pages to convey relevant information.
All of such pages are significant, but here is the list of 5 pages that you must have on your blog.
1. What Are The 5 Most Important Pages On Your Blog?
Here’s a quick overview of how to make pages with WordPress. This is just as easy to do as making a post.
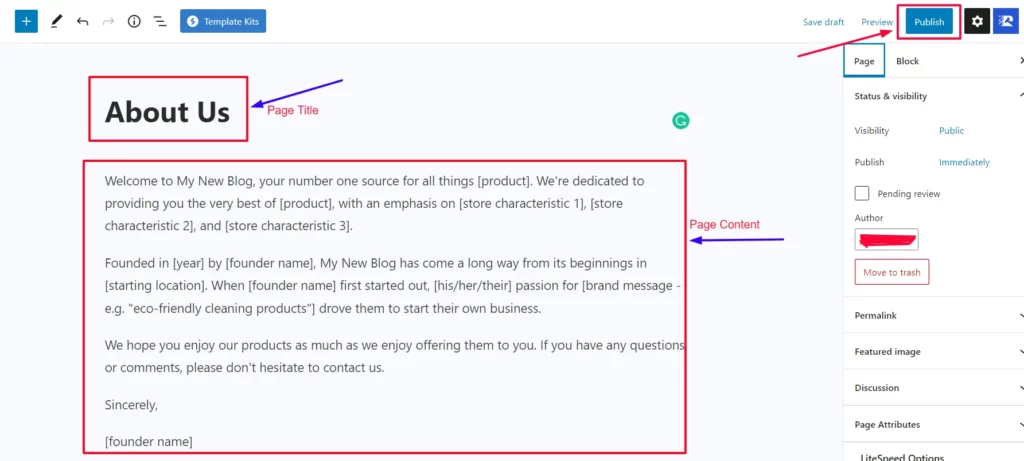
Step 1
Navigate to the “pages” option in the left menu of your WordPress Dashboard and select “Add New.”
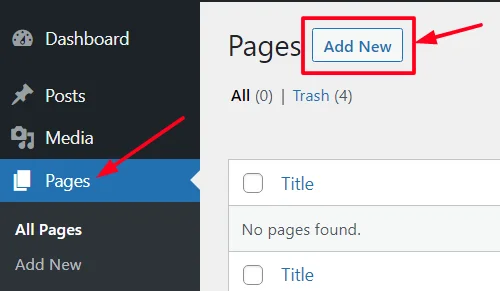
Step 2
Fill out the form that asks: Page title and required content. Once your page is complete, click “Publish”.
3. What To Write On These Important Pages?
Now you must be wondering what to write on these pages. Well, you can simply take ideas from other blogs. As the Page names suggest, you will write about yourself on the ‘About Us’ page.
Similarly, provide your contact details on the ‘Contact Us’ page. For pages like ‘Privacy Policy’ or ‘Disclaimer’, there are some tools (like PolicyMaker, Termly, GetTerms, etc.) that you can use to generate content for them.
Step 9: Start Writing Informative & High-Quality Blog Articles

Now your WordPress blog is ready to publish content or articles. I will recommend you prepare 3-5 posts before publishing them live. But the question is, what on earth should you write about?
Let me make it simple for you;
1. What To Write In Your First Blog Post?
Starting with an “introductory post” that describes who you are, what you’ll be blogging about, and for whom you are writing is a good strategy. Just keep it short, write in your own style and show your purpose for this blog.
2. How To Start Writing Your Blog Posts?
You can use keyword research to find topics that interest your target audience for your next two to four posts. AnswerThePublic is a perfect tool for doing research like this.
Simply go to the website, type one or more keywords, and then click “Search.” Just make sure you select the right country from the drop-down list at the bottom.
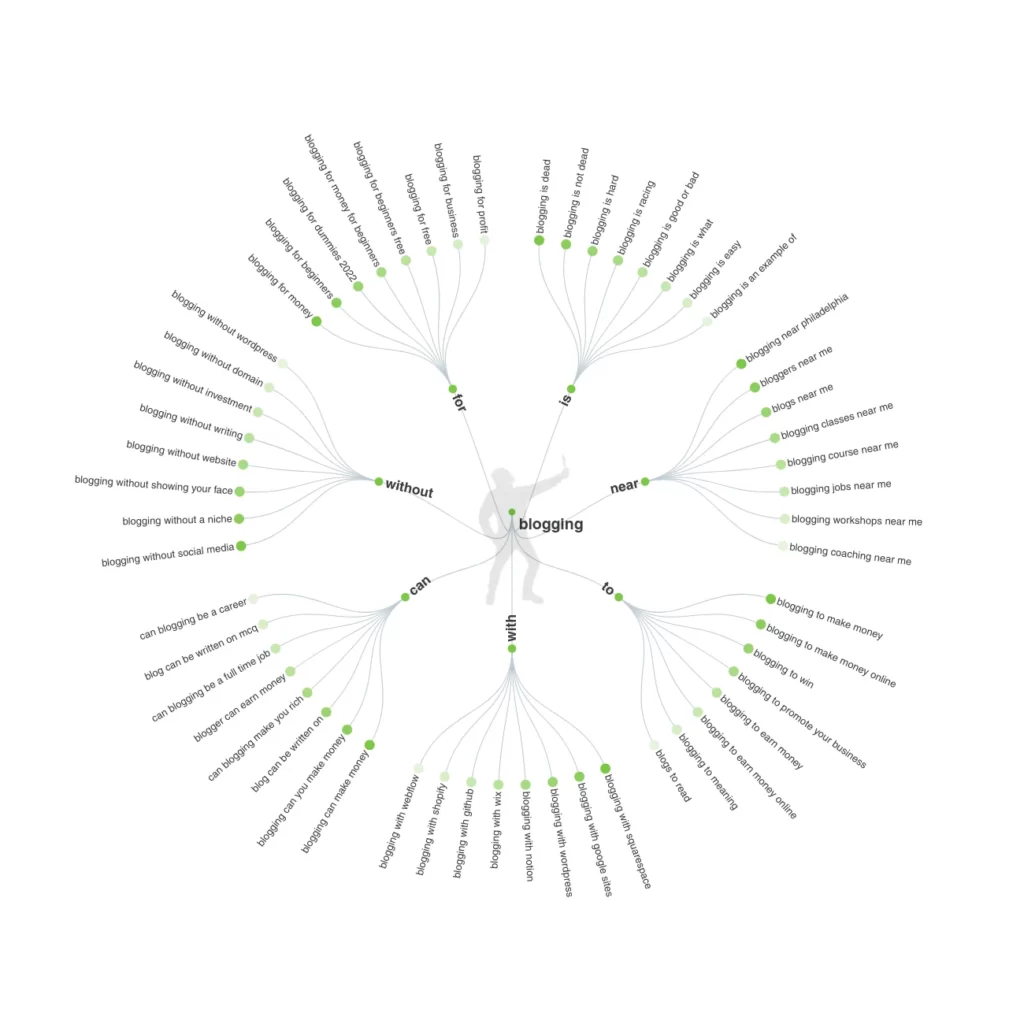
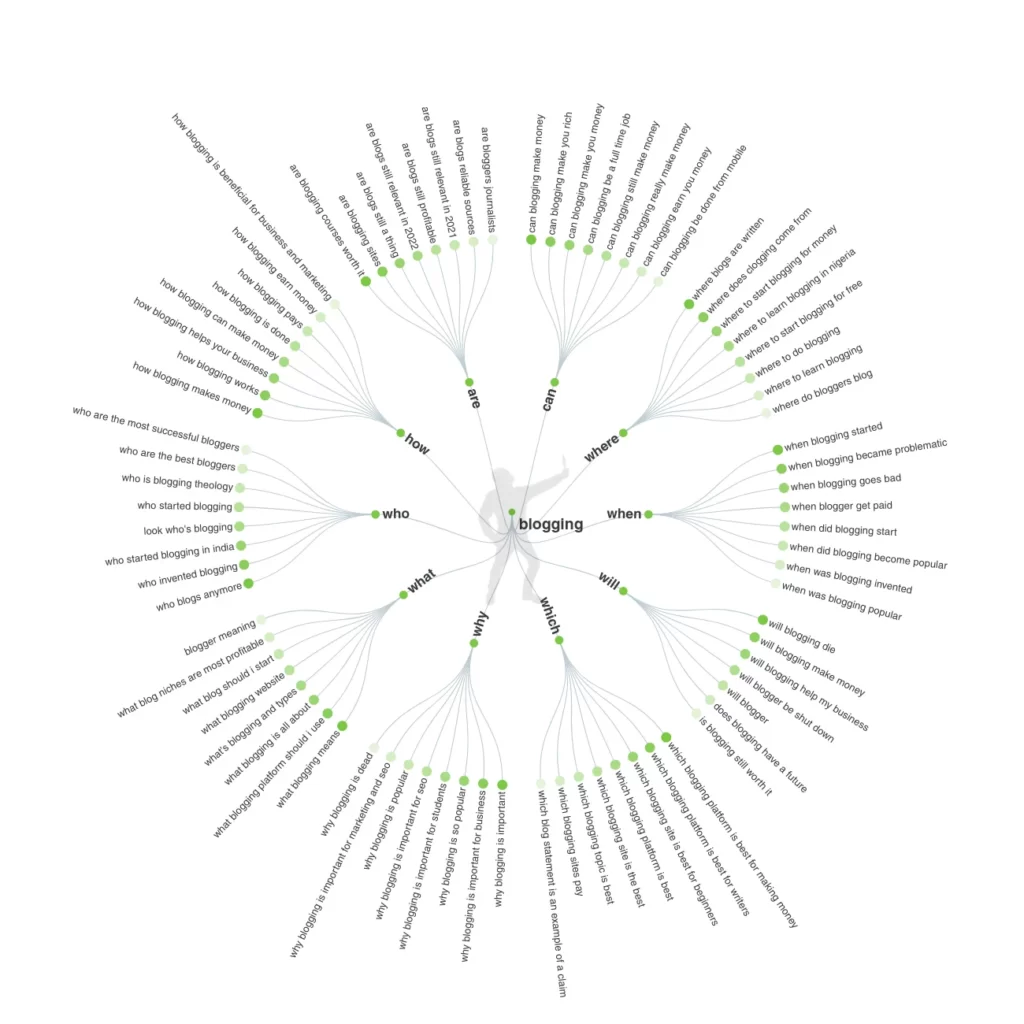
AnswerThePublic will give you a list of prospective topics for your first post within a few seconds. You can look through many categories to find ideas for various content types, such as questions, prepositions, and even comparisons.
After a few posts, you will require a good keyword research tool like Ahrefs and Semrush. Get to try the Semrush trial here. But since you’re a beginner, I am not writing about that in this article. It’s a vast topic to learn, so we will talk about that in another post.
3. How To Post An Article On WordPress?
Writing an article & publishing it through WordPress is quite easy.
Step 1
Go to your WordPress dashboard. Click on ‘Post’ and ‘Add New’.
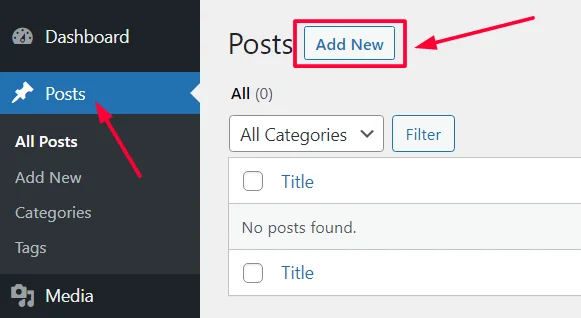
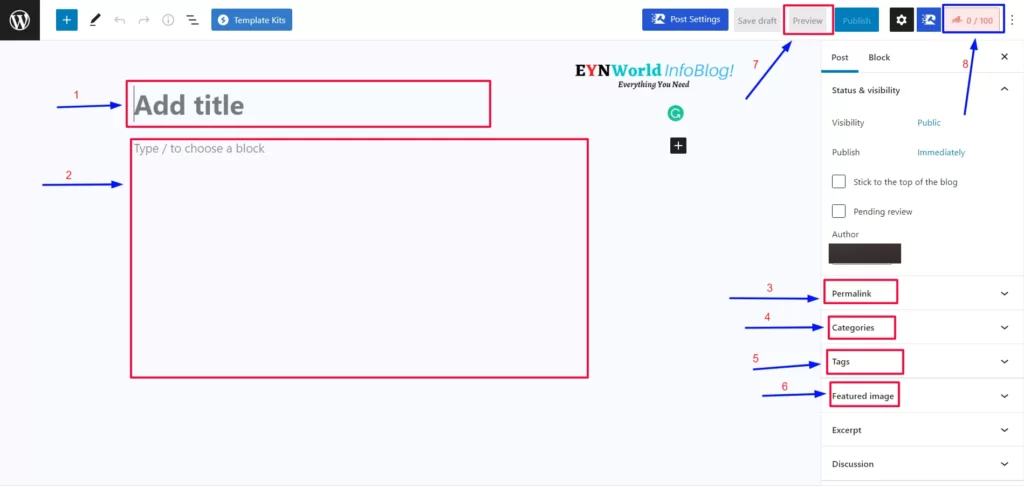
Step 2
A page will open up where you can write your article.
Step 3
After clicking on RankMath SEO Icon, Write your keyword in the Focus Keyword box. And then click “Edit Snippet”.
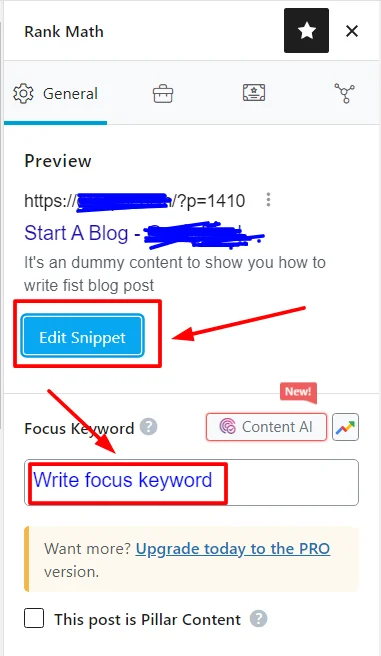
Step 4
A modal ‘Preview Snippet Editor’ will open, and fill in the details such as Post’s SEO title, Post permalink, and Post description, which will be present on Google search results. So write these things carefully.
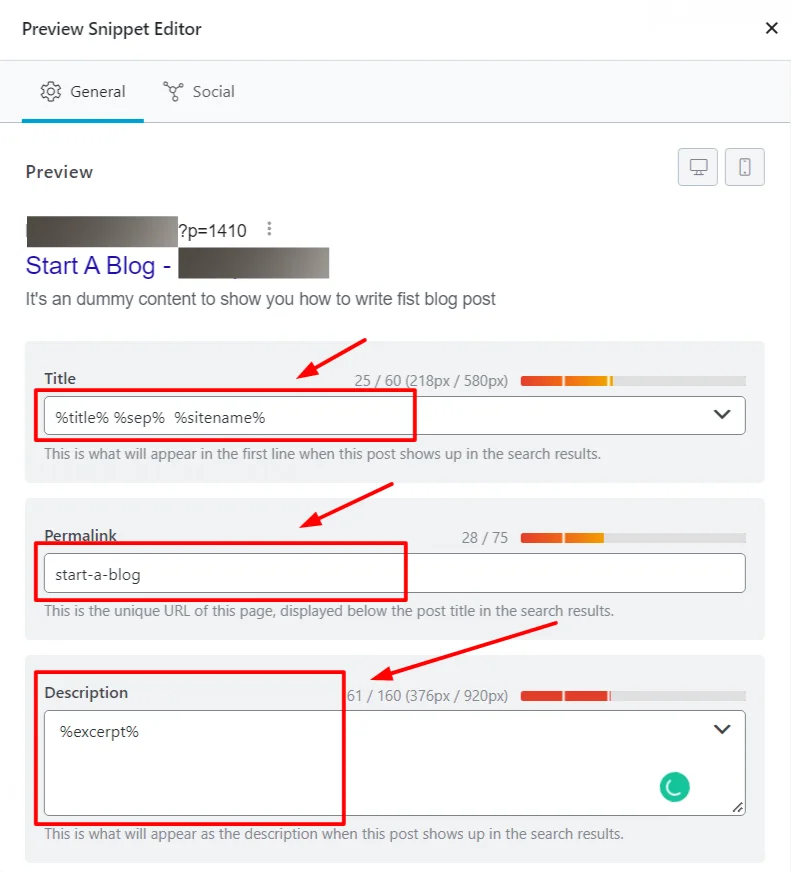
Step 5
Recheck blog content once again, and after review click ‘Publish’.
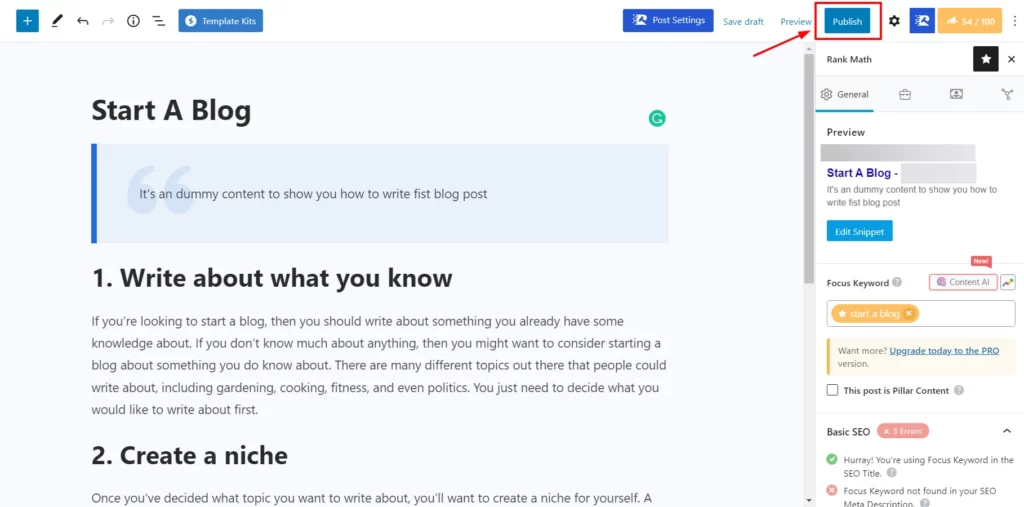
Hurray! 😍 Your first blog post has been published.
While writing your blog post Consider these things To rank quickly
- First, find your topic & do keyword research for your blog post.
- Try to use long tail keywords that would rank easily.
- Make sure to use the numbers in your title, like- 15 Easy Ways to Speed Up Your WordPress Site (Ultimate 2024 Guide)
- The post should be informative, complete, and initially written by you.
- Use some related images, graphics, and videos.
- Don’t use copyrighted material such as images, videos, graphics, and content.
- Always use the targeted (focus) keyword in at least one heading, at the beginning of the content, and in the image/graphics title & alt tag to Optimize your post according to the search engine.
Step 10: Submit Your Content To Google Search Console To Rank Fast
It’s time to let Google know your blog & blog posts exist, by submitting your website URL to Google Console, so your blog can show up in the Google search results.
1. How To Submit Your Blog To Google Webmaster?
Step 1
Visit the Google Webmaster and log in with your Google account. Click ‘Search Property’ & click on ‘Add Property’.
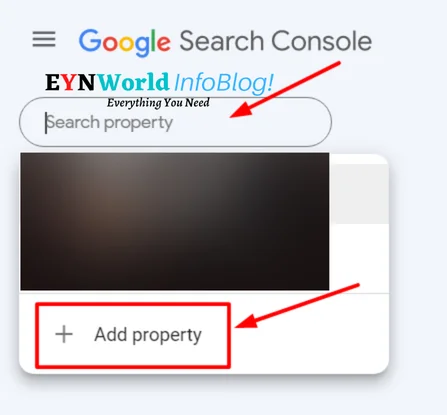
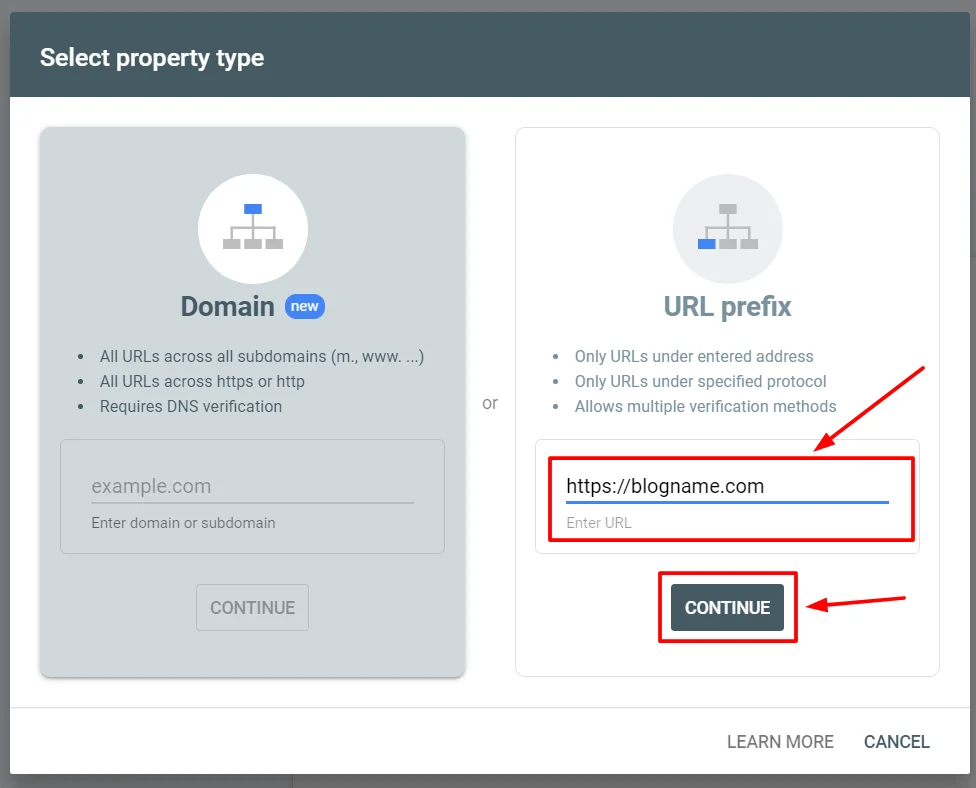
Step 2
Now you’ll see a ‘Select property type’ modal. Use the URL prefix, enter your website address/blog name (https://blogname.com), and click Continue.
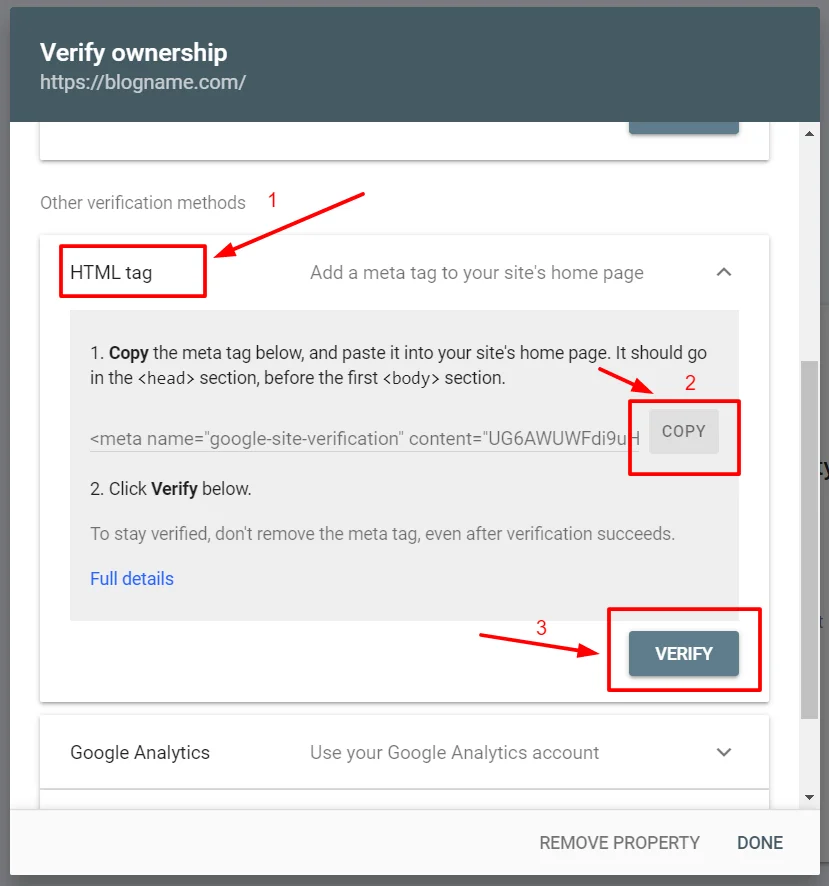
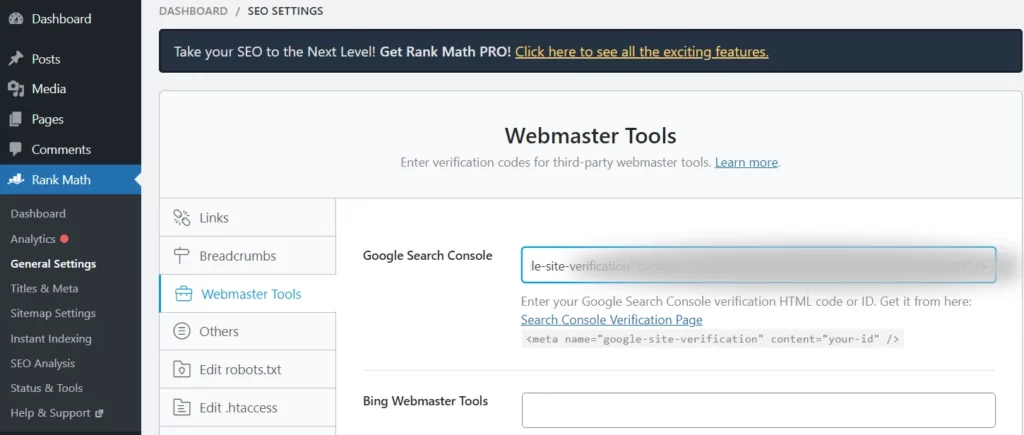
Step 3
Now you’ll see the ‘Verify Ownership’ step, Scroll down and select ‘HTML Tag’ for verification. Copy the HTML tag (verification code) and paste it on RankMath’s > Webmaster Tools > Google Search Console, and Save Changes. Click on Verify.
2. How To Submit Your Blog Post To Google Search Console?
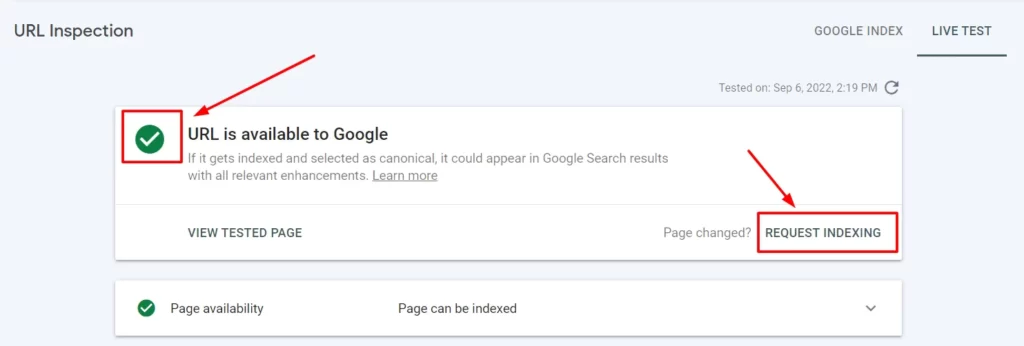
After verifying your ownership you can simply use the Google Search console. You can submit your article in the search console by clicking on the URL Inspection.
Step 1
Paste your Post URL in the URL Inspection area and click Enter.

Step 2
After the inspection is done, you can test the Live URL.
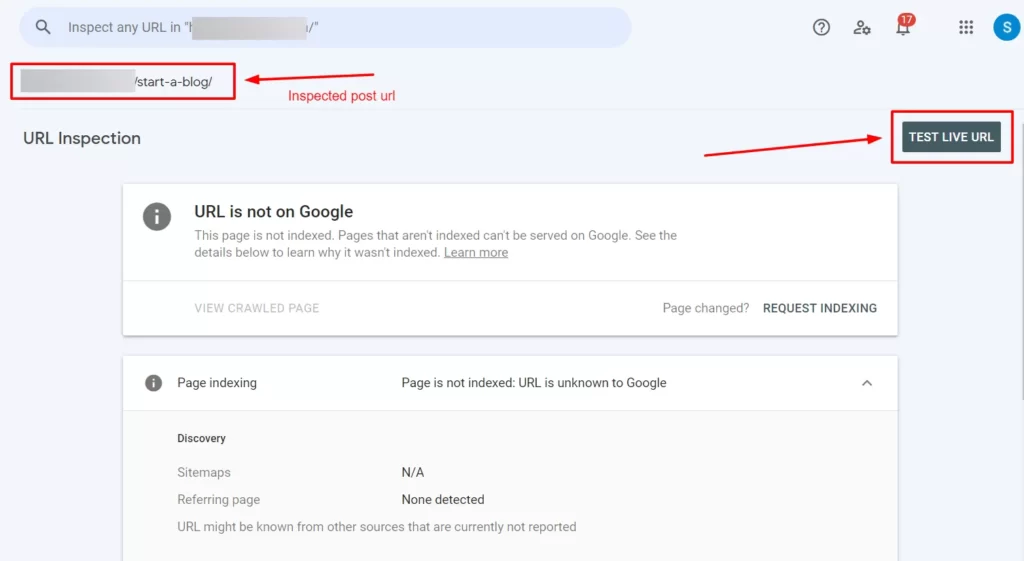
Step 3
When it is done, it will show a green tick ✅. Now click on Request Indexing for post-indexation. So that your blog may appear in Google search results quickly.
Step 11: Set Up Google Analytics Integration

Google Analytics is a strong and effective tool that offers valuable data about your website as well as visitors.
The tool offers you access to a variety of data about the users of your website. If you don’t already have an Analytics account, your first action should be to create one.
How To Create A Google Analytics Account And Create Google Analytics Property?
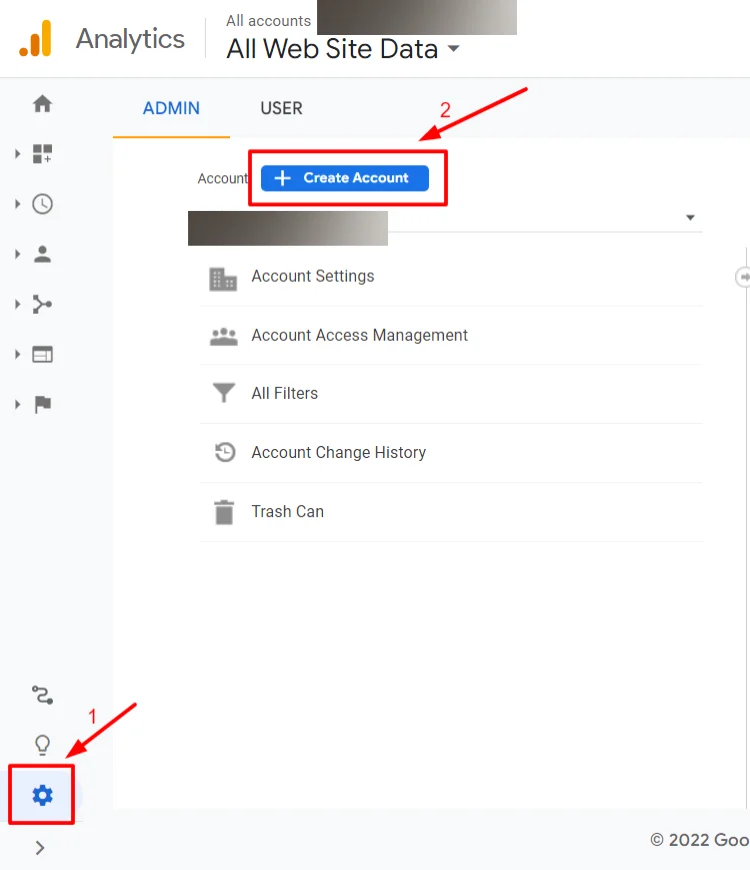
Step 1
Open Google Analytics, sign in with your Google Account, and go to your Google Analytics Admin Panel. And Go to the account column, and click on ‘Create Account.’
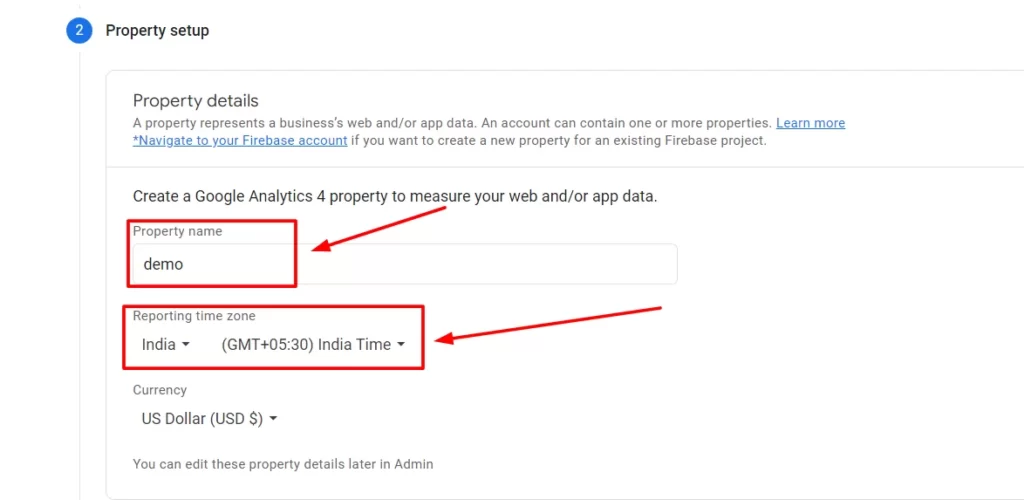
Step 2
Fill in the account name, click next and Give the property name, select country name in Property settings, click next, fill in basic business information, and click Create.
Step 3
Configure the data-sharing settings; choose platform Web.

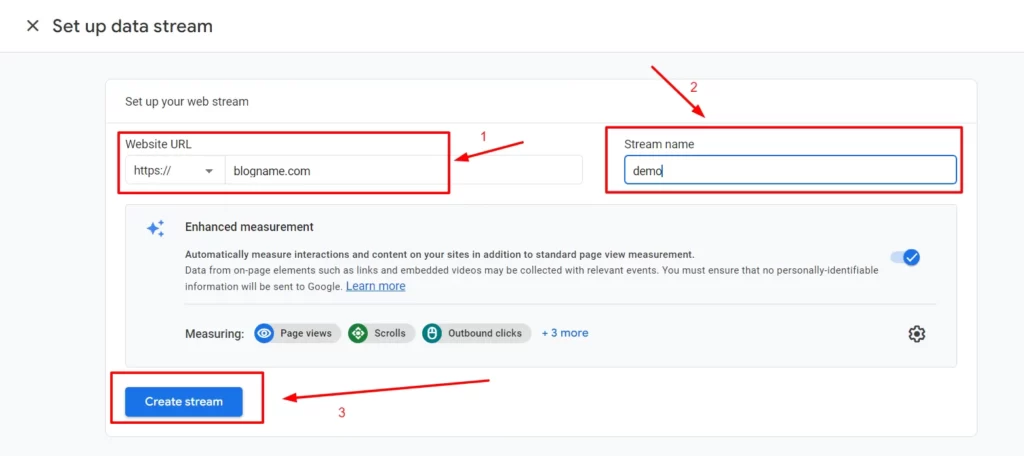
Step 4
Fill in details such as the Website URL and stream name to set up the ‘Data stream’ and click ‘Create Stream.’
Step 5
After stream creation, you’ll see a tag instruction along with the blog name and stream Id; click on it.
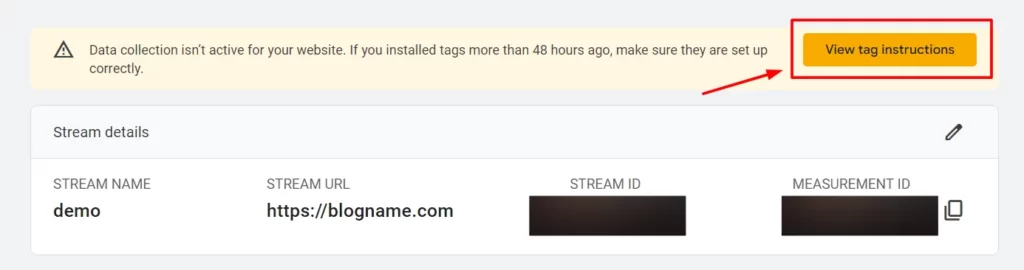
Step 6
Now you’ll see the installation instructions page, Click on the install manually tab and copy the code.
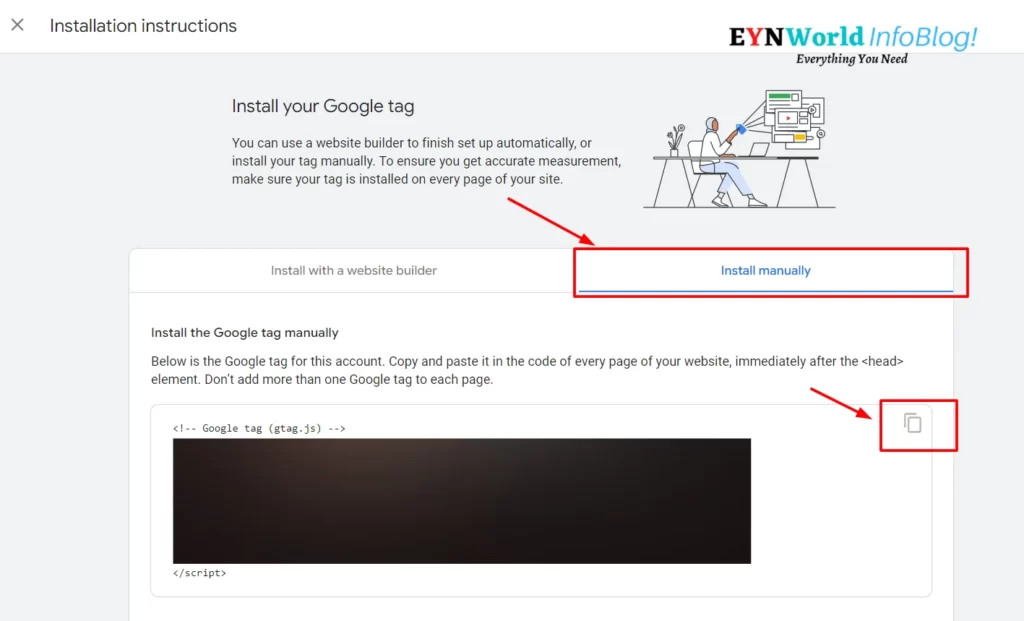
Step 7
Now paste the copied code at Appearance> Customize> Custom code snippets> Footer scripts and click Publish.

Step 12: Start Making Money With Your Blog Consistently

To start making money your blog must have some quality articles. I will recommend you have at least 30 posts or articles. Make sure that each post must have 800+ words so that they can get ranked.
After that, you and your blog are ready to start making money. Here are some best strategies to make money consistently through your blog.
1. Make Money With Ads?
It is the simplest and most well-liked method of making money among bloggers. It will enable you to monetize your traffic and generate significant revenue.
In these approaches, Google AdSense monetization is more common. They are being used by many bloggers to generate significant revenue.
However, Google Adsense is not the only option you have. There are lots of others also available such as Ezoic, Mediavine, Adsthrive, Freestar, etc.
Simply applying for it and complying with their privacy policy is all that is required. If all goes according to plan, your application will be accepted, and you’ll be able to monetize your site by running its advertising.
2. Earn Through Affiliate Marketing?
This is an excellent method to monetize your site. This blog is also monetized with Affiliate. You’re required to advertise a product in this method. The product’s owner will give you a commission if your promotion helps sell the item.
This is a perfect technique to generate money online if you have a reliable audience. In this method, you don’t need a huge audience.
For the affiliate marketing of physical products, you can go with sites like Amazon, Flipkart, Walmart, ShareASale, etc.
Similarly, if you want to earn through affiliate marketing digital products, there are sites like ClickBank, Digistore24, JVZoo, WarriorPlus, and so on.
3. Sell Online Services Through Your Blog?
If you are experienced in a particular field or have a special area of expertise, you can offer that to your audience as a service.
Your readers directly compensate you for these services. By doing this, you can quickly make money from your new blog.
For example, you can offer similar services to what you’re already doing like – Content Writing, Blog Setup, Keyword Research, Image Designing, etc.
4. Make Money By Selling Courses & Digital Products?
You can create an ebook, tutorial, or an entire course. Make sure that your creation (product) is relevant to your blog.
Now mention your product in your articles or present it as a banner. Your trusted audience will show an interest in buying it from you.
This is also an excellent way to make money through your blog by selling such digital products. But you must first build a good readership for your blog before doing this.
5. Earn With Guest Posts?
There are so many marketers & business owners who want to promote their product or offer through blogs. Or sometimes they require backlinks to rank their own blog or website.
In that case, you can offer them to write on your blog in exchange for a certain amount of money. These kinds of blog posts are called Guest Posts.
6. Make Money With Sponsorships?
You could also consider selling sponsored blog posts to generate income. It’s quite easy to understand and operates similarly to any other sponsorship deal in which a business pays you to write about its brand, product, or service on your blog.
Initially, you have to approach a brand or company to write a sponsored post for them. But when your blog becomes popular & starts getting ranked, it will reach you automatically.
It would be better to create a dedicated page on your blog to let others know that you’re open to sponsored posts.
FAQs
1. Can You Start Blogging From Your Smartphone?
Yes, it’s true that you can start blogging from your smartphone and you may be surprised to know that a few Indian bloggers have started their blogging careers with their smartphones.
But they had to struggle more as phones have their own limitations. You can do some sort of activities but it isn’t possible to handle everything like customizing your blog layouts or designing different blocks.
So, I will recommend you access a laptop or computer. Or you may visit your nearby cyber cafes for a few hours daily.
2. What Is The Cost Of Starting A Blog?
The primary cost of blogging consists of the prices of your domain and a hosting plan. On average, it will cost you ₹2,500 to ₹5000 ($35-$65) per year. It means you can afford this at just ₹250-400 ($3-$5) every month.
However, there are so many things to invest in blogging like themes, plugins, and so on. But initially, you can start your blog with just a domain name and a good hosting service.
3. Can I Start A Blog For Free?
Yes, you can start a blog for free in India. There are many platforms that allow you to do so, such as Blogger, Hubspot, Medium, Quora, LinkedIn, and so on.
But you must consider why are they free. Free things have limits, right? ☹️You can’t take backups, design your layout, customize things, and so on. You will have almost no control over your content.
If you’re serious about making money, and your blogging journey and you want to do it for a long-term goal, I will recommend you to have a paid domain and hosting.
4. How To Start Blogging In India & Make Money From It?
There are numerous ways to make money through blogging in India. The most common ways are through ads like – Google AdSense, Ezoic, etc.
Apart from these, you can also make money through Affiliate Marketing, Sponsorships, Guest Posts, selling products, providing services, and so on.
5. I Started A Blog, Now How Can I Get Traffic?
There are unlimited ways to get traffic on your blog. Primarily there are two types of traffic – organic & paid.
For organic traffic, you should focus on SEO, keyword research, social media content, and post blog articles consistently.
For paid traffic, you can invest some money into Google Ads, Bing Ads, Quora Ads, Facebook Ads, and so on. Making backlinks and guest posts are also effective methods to get decent traffic.
6. How To Convert A Blog Into A Pro Business?
Information, consultation, physical products, digital products, or services. So your blog will also be able to sell the same things.
Initially, you will have to make some extra efforts to set up your blog, fill in content, and make a productive ecosystem. But in the long term, you can easily convert your blog into a successfully running business.
7. Is It Too Late To Start A Blog In 2024?
The same question people had asked in 2012, 2015, 2019, 2022 & 2024. They may also ask the same in 2025. But the answer remained the same – “It’s a perfect time to start a blog in 20XX”.
If blogging weren’t effective, you wouldn’t be reading this article at this very end. The fact is that all the search engines around the world, including Google & Bing, are based on text format.
All their algorithms & bots are used to work on keywords and they always prefer to rank written content (like a blog). Even the images & YouTube videos rely on keywords to rank.
You can test it yourself, go to Google or Bing, search anything, and check what are the top 10 results. Aren’t they blogs & websites?
8. What Are Some Of The Best Blog Topics/Niches For 2024?
Well, every niche has its potential. It’s always better to focus on a micro niche to avoid or lessen competition. Health, Finance, Technology, Insurance, Gardening, Academics, etc. are some of the evergreen niches.
You can also start with a futuristic niche like Electric vehicles, Drones, AI, Crypto, Metaverse, and so on. But make sure that you have some interest or knowledge about them.
Final Thoughts on How to Start Blogging In India
We have come to the end of this article. So, what do you think – ‘start blogging in India or How to start a blog in India will take too much time & effort? 🤔
Well, that isn’t true!😍 I know, this article is too long but the blog creation process isn’t! Yeah, nothing can happen overnight but once you start the process, you will see a brighter side.
Once you involve yourself in blogging, you will start enjoying the process. Just take one step at a time, have patience & stay focused.
You don’t need to be very professional or too fancy. Take imperfect but immediate action!
Before leaving, let me share with you a quick checklist to start blogging in India in 2024.
So, that’s it for today. Hope you have cleared everything in your mind. Now it’s your turn to take action. If you get confused at any step, just come back to this article & read it again.
If you still have any queries, you can post them below in the comments. I wish you a very happy, adventurous, and successful blogging journey! 😍

Very interesting article and step by step detailed information from starting a blog to earning from different methods are very well explained by Satyam.
Thanks Bhai for your valuable feedback 😊
This is a perfect guide to start a blog for Indian newbie bloggers indeed! Keep it up Satyam! 👍
Thank You bhai 😍
Well written and in-depth article.
Keep it up Satya 🔥
All the best.
Thank You Bhai 😊
No matter how many blog posts on the same topic of how to start a blog in India on the internet, it all looks good and I used to read every post nowadays in my free time. I am glad to experience Indian bloggers’ different perspectives on this topic.